Author: droq2raqxy2m

  • new_metric_for_demographic_parity

    Implmentation for TMLR paper: Retiring ΔDP: New Distribution-Level Metrics for Demographic Parity, [Openreview], [Arxiv], by Xiaotian Han*, Zhimeng Jiang*, Hongye Jin*, Zirui Liu, Na Zou, Qifan Wang, Xia Hu

    1. Introduction

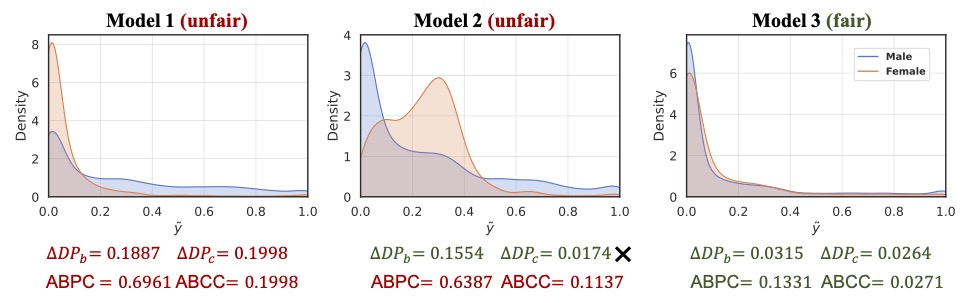
    Lots of fairness definitions (e.g., demographic parity, equalized opportunity) has been proposed to solve different types of fairness issues. In this paper, we focus on the measurement of demographic parity, $\Delta DP$, which requires the predictions of a machine learning model should be independent on sensitive attributes.

    1.1 Drawbacks of commonly used $\Delta DP$

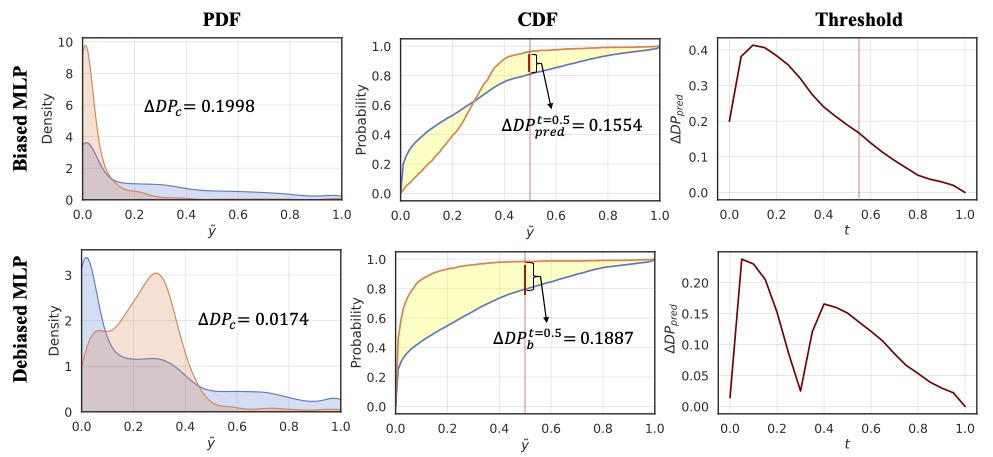
    In this paper, we rethink the rationale of $\Delta DP$ and investigate its limitations on measuring the violation of demographic parity. There are two commonly used implementations of $\Delta DP$, including $\Delta DP_c$ (i.e., the difference of the mean of the predictive probabilities between different groups, and $\Delta DP_b$ (i.e., the difference of the proportion of positive prediction between different groups. We argue that $\Delta DP$, as a metric, has the following drawbacks:

    1. Zero-value $\Delta DP$ does not guarantee zero violation of demographic parity.

    1. $\Delta DP$ value is highly correlated to the selection of the threshold for the classification task.

    1.2 The Proposed ABPC & ABCC

    We propose two distribution-level metrics, namely Area Between Probability density function Curves (ABPC) and Area Between Cumulative density function Curves (ABCC), to retire $\Delta DP_{c}$ and $\Delta DP_{b}$ as follows:

    $$ABPC = TV(f_0(x), f_1(x)) = ∫_{0}^{1}|f_0(x) – f_1(x) | dx,$$ $$ABCC = TV(F_0(x), F_1(x)) = ∫_{0}^{1}|F_0(x) – F_1(x)| dx,$$

    ABPC and ABCC have following advantages:

    1. Zero-value ABPC/ABCC is a necessary and sufficient condition to achieve demographic parity.

    2. The prediction independency to sensitive attributes can be guaranteed over any threshold.

    2. Implementation

    2.1 Python package

    torch                         1.10.0
    statsmodels                   0.13.1
    scikit-learn                  1.0.1
    pandas                        1.3.4
    numpy                         1.21.2
    aif360                        0.4.0
    

    2.2 Run cmd

    run the following commands at current directy

    bash run.sh
    
    python -u ./src/bs_tabular_mlp.py --data_path ./data/adult  --dataset adult --sensitive_attr sex --exp_name adult_mlp --batch_size 256 --epoch 10 --seed 31314
    python -u ./src/bs_tabular_reg.py --data_path ./data/adult  --dataset adult --sensitive_attr sex --exp_name adult_reg --batch_size 256 --epoch 10 --seed 31314 --lam 1
    python -u ./src/bs_tabular_adv.py --data_path ./data/adult --dataset adult --sensitive_attr sex --exp_name adult_adv --batch_size 256 --epoch 40 --seed 31314 --lam 170

    2.3 Python Implementation for ABPC and ABCC

    def ABPC( y_pred, y_gt, z_values, bw_method = "scott", sample_n = 5000 ):
    
        y_pred = y_pred.ravel()
        y_gt = y_gt.ravel()
        z_values = z_values.ravel()
    
        y_pre_1 = y_pred[z_values == 1]
        y_pre_0 = y_pred[z_values == 0]
    
        # KDE PDF     
        kde0 = gaussian_kde(y_pre_0, bw_method = bw_method)
        kde1 = gaussian_kde(y_pre_1, bw_method = bw_method)
    
        # integration
        x = np.linspace(0, 1, sample_n)
        kde1_x = kde1(x)
        kde0_x = kde0(x)
        abpc = np.trapz(np.abs(kde0_x - kde1_x), x)
    
        return abpc
    def ABCC( y_pred, y_gt, z_values, sample_n = 10000 ):
    
        y_pred = y_pred.ravel()
        y_gt = y_gt.ravel()
        z_values = z_values.ravel()
    
        y_pre_1 = y_pred[z_values == 1]
        y_pre_0 = y_pred[z_values == 0]
    
        # empirical CDF 
        ecdf0 = ECDF(y_pre_0)
        ecdf1 = ECDF(y_pre_1)
    
        # integration
        x = np.linspace(0, 1, sample_n)
        ecdf0_x = ecdf0(x)
        ecdf1_x = ecdf1(x)
        abcc = np.trapz(np.abs(ecdf0_x - ecdf1_x), x)
    
        return abcc

    3. Citation

    Please kindly cite the following paper if you found our code helpful!

      @article{han2023retiring,
        title={Retiring $$\backslash$Delta $ DP: New Distribution-Level Metrics for Demographic Parity},
        author={Han, Xiaotian and Jiang, Zhimeng and Jin, Hongye and Liu, Zirui and Zou, Na and Wang, Qifan and Hu, Xia},
        journal={arXiv preprint arXiv:2301.13443},
        year={2023}
      }

    4. Credit

    We use Github Copilot to generate some comments in important code.

    Visit original content creator repository
  • pitchfork-npm

    #Pitchfork Client

    Travis CI

    An unofficial Node.js client for Pitchfork reviews based on the Pitchfork API Client for Python.

    Install

    Using NPM

    npm install pitchfork

    Using Github

    git clone git@github.com:omardelarosa/pitchfork-npm.git

    You can then use it as a command-line tool or as a node module

    ##API

    You can require pitchfork and use it inside of any Node.JS application.

    var p4k = require('pitchfork')

    Search

    A Search constructor that extends EventEmitter. Listeners can be attached to the ‘ready’ event which will fire when all reviews have been fetched and parsed. For example:

    var p = require('pitchfork')
    var s = new p.Search('wilco')
    
    s.on('ready', function(results){
      console.log("results", results)
    })
    
    //=> [ {Review}, {Review}, {Review}, ... ]

    .results

    An Array of Review objects.

    .init()

    Called once when Search is instantiated to fetch results. Not usually called directly

    Page

    A Page constructor that extends EventEmitter. This constructor takes an integer argument specifying which page of reviews you wish to fetch from /reviews/albums/:page_num. Listeners can be attached to the ‘ready’ event which will fire when all reviews have been fetched and parsed. For example, this would return all the most recent reviews:

    var p = require('pitchfork')
    var s = new p.Page(1)
    
    s.on('ready', function(results){
      console.log("results", results)
    })
    
    //=> [ {Review}, {Review}, {Review}, ... ]

    Review

    The Review constructor encapsulates methods and data relating to the Pitchfork review. The Review extends EventEmitter and fires a ‘ready’ event when the review has been fetched and parsed.

    .attributes

    An Object with information about the album and its text. Sample below:

    {
      "url": "/reviews/albums/9419-the-letting-go/",
      "name": "Bonnie \"Prince\" Billy - The Letting Go",
      "artist": "Bonnie \"Prince\" Billy",
      "album": "The Letting Go",
      "title": "Bonnie \"Prince\" Billy: The Letting Go | Album Reviews | Pitchfork",
      "label": "Palace / Drag City",
      "year": "2006",
      "score": 8.2,
      "cover": "http://cdn.pitchfork.com/albums/9255/homepage_large.e8a2bd20.jpg",
      "author": "Mark Richardson",
      "date": "September 18, 2006",
      "editorial": {
        "text": "...",
        "html": "..."
    }

    .fetch()

    This method is automatically called when the Review is instantiated and returns a Promise. This generally isn’t called directly.

    .promise

    This stores the thennable promise object generated by .fetch for attaching .then-style callbacks.

    .verbose()

    The full Review instance represented as JSON.

    {
      "url": "/reviews/albums/9419-the-letting-go/",
      "name": "Bonnie \"Prince\" Billy - The Letting Go",
      "artist": "Bonnie \"Prince\" Billy",
      "album": "The Letting Go",
      "title": "Bonnie \"Prince\" Billy: The Letting Go | Album Reviews | Pitchfork",
      "label": "Palace / Drag City",
      "year": "2006",
      "score": 8.2,
      "cover": "http://cdn.pitchfork.com/albums/9255/homepage_large.e8a2bd20.jpg",
      "author": "Mark Richardson",
      "date": "September 18, 2006",
      "editorial": {
        "html": " <p>Though Will Oldham began his musical career while in his early twenties, ... deep absorption or self-reflection so much as a kind of fond familiarity. </p> ",
        "text": " Though Will Oldham began his musical career while in his early twenties ... deep absorption or self-reflection so much as a kind of fond familiarity.  "
      }
    }

    .truncated()

    The attributes of the Review instance with editorial.html/editorial.text condensed into the first 300 characters of of the text assigned to the key ‘.text’.

    {
      "url": "/reviews/albums/9419-the-letting-go/",
      "name": "Bonnie \"Prince\" Billy - The Letting Go",
      "artist": "Bonnie \"Prince\" Billy",
      "album": "The Letting Go",
      "title": "Bonnie \"Prince\" Billy: The Letting Go | Album Reviews | Pitchfork",
      "label": "Palace / Drag City",
      "year": "2006",
      "score": 8.2,
      "cover": "http://cdn.pitchfork.com/albums/9255/homepage_large.e8a2bd20.jpg",
      "author": "Mark Richardson",
      "date": "September 18, 2006",
      "text": " Though Will Oldham began his musical career while in his early twenties, he's never exactly sounded young. From his first releases as Palace Music, Oldham's whiskey-soaked vocals and lyrical obsessions with death, sex, and religion have made \"maturity\" something of a non-issue. And yet, with his mo..."
    }

    .text_pretty_print()

    Prints a plain-text representation of the review.


    CLI (Command-Line Interface)

    Returns a review for a given artist and album title.

    $ pitchfork wilco 'yankee hotel foxtrot'
    # { ... pretty-printed, colorized quasi-JSON object... }

    or you can use -a and -t flags.

    $ pitchfork -a wilco -t 'yankee hotel foxtrot'
    # { ... pretty-printed, colorized quasi-JSON object... }

    Returns a list of reviews for a given artist with no album.

    $ pitchfork -a 'wilco'
    # [ 
    #    { ... pretty-printed, colorized quasi-JSON object... },
    #    { ... pretty-printed, colorized quasi-JSON object... },
    #    { ... pretty-printed, colorized quasi-JSON object... }
    # ]

    For valid, uncolored JSON, use the –json flag:

    $ pitchfork -a 'wilco' -t 'yankee hotel foxtrot' --json
    # { ... valid JSON object... }

    Flags

    flag(s) required argument description
    -a y artist_name returns a review by given artist
    -t album_title returns a review by given album title
    -j,–json returns review attributes as un-prettified json
    -v, –verbose returns review entire object as json
    -V, –version returns version number
    -T,–truncated returns a truncated json object of the review attributes
    -tx,–text returns a text version of review (ex: to pipe output to ‘less’ )
    -p page_number returns a list of reviews located on the specified page


    Visit original content creator repository

  • aemdesign-aem-support

    aemdesign-aem-support

    build_status Quality Gate Status codecov Maven Central github license github issues github last commit github repo size github repo size github release Visit AEM.Design Gitter

    A set of content and support projects that should be deploy alongside aemdesign-aem-support.

    Documentation

    Contributing

    Contributions are welcome! Read the Contributing Guide for more information.

    Available Components

    Detailed table of component can be found here Component List.

    Component Category Link
    Cloud Services / Rest Rest
    Cloud Services / Salesforce API Salesforce API
    Common / Redirection Notification Redirection Notification
    Common / Static Content Include Static Content Include
    Common / Timing Component Timing Component
    Content / File Download Link File Download Link
    Content / Embed Source Embed Source
    Content / External External
    Content / Link Link
    Content / Content Reference Content Reference
    Content / Table Table
    Content / Rich Text Rich Text
    Content / Tool Tip Tool Tip
    Content / Page Author Page Author
    Content / Page Date Page Date
    Content / Page Description Page Description
    Content / Page Tags Page Tags
    Content / Page Title Page Title
    Details / Contact Details Contact Details
    Details / Event Details Event Details
    Details / Location Details Location Details
    Details / News Details News Details
    Details / Page Details Page Details
    Layout / Article Article
    Layout / Aside Aside
    Layout / Breadcrumb Breadcrumb
    Layout / Columns Columns
    Layout / Content Block Content Block
    Layout / Content Block Lock Content Block Lock
    Layout / Content Block Menu Content Block Menu
    Layout / Content Tabs Content Tabs
    Layout / Footer Footer
    Layout / Header Header
    Layout / Nav Bar Nav Bar
    Layout / Container Container
    Lists / Asset List Asset List
    Lists / Contact List Contact List
    Lists / Event List Event List
    Lists / Lang Nav Lang Nav
    Lists / List List
    Lists / List Nav List Nav
    Lists / Location List Location List
    Lists / News List News List
    Lists / Page List Page List
    Lists / Search Results List Search Results List
    Lists / Tag List Tag List
    Lists / Nav List Nav List
    Media / Audio Audio
    Media / Image Image
    Media / Video Video
    Analytics / Analytics Data Layer Analytics Data Layer
    Template / AEM.Design Base Page AEM.Design Base Page
    Template / Cloud Config / AddThis AddThis
    Template / Cloud Config / Google Analytics Google Analytics
    Template / Cloud Config / Google Maps Google Maps
    Template / Column / AEM.Design One Column Page AEM.Design One Column Page
    Template / Column / AEM.Design Three Column Page AEM.Design Three Column Page
    Template / Column / AEM.Design Two Column Page AEM.Design Two Column Page
    Template / Common / Design Importer Design Importer
    Template / Experience Fragment / AEM.Design Experience Fragment AEM.Design Experience Fragment
    Widgets / AddThis / Addthis Button Addthis Button
    Widgets / Online Media Online Media
    Widgets / Search Box Search Box
    Workflow / Process Payload Process Payload
    Workflow / Project Task Manager Project Task Manager
    Workflow / Project Update Project Update
    Workflow / Rest Rest
    Workflow / Salesforce API Salesforce API
    Workflow / Send Email Send Email
    Coral / Common/Form / Tag Field Tag Field
    Coral / Datasources / Forms Forms
    Coral / Datasources / Tags Tags
    Coral / Foundation / Accordion Accordion
    Coral / Widgets/Form / Asset Options Asset Options

    Component Versioning

    The components’ versioning scheme is documented on the AEM Core WCM Components’ versioning policies wiki page.

    System Requirements

    The latest version of the Core Components, require the below system requirements:

    AEM Version 2.0.0
    6.4 yes
    6.5 yes

    Installation

    To install everything, excluding examples, the released aggregate package aemdesign-aem-support-deploy can be installed via the AEM Package Manager.

    For more information about the Package Manager please have a look at How to Work With Packages documentation page.

    Package Dependencies

    Following packages are dependencies and should be installed on your AEM instance before installing AEM.Design:

    Build

    The project has the following requirements:

    • Java SE Development Kit 8 or Java SE Development Kit 11
    • Apache Maven 3.3.1 or newer

    For ease of build and installation the following profiles are provided:

    • deploymentpackage – activates packaging of aemdesign-aem-support-deploy
    • installdeploymentpackage – installs the deploy package/bundle to an existing AEM author instance

    You can use helper script for ease of local deployment

    • deploy-local – deploy aemdesign-aem-support-deploy package to your local AEM instance running on port 4502
    • deploy-local-publish – deploy aemdesign-aem-support-deploy package to your local AEM instance running on port 4503

    UberJar

    This project relies on the AEM 6.4 cq-quickstart. This is publicly available on https://repo.adobe.com

    For more details about the UberJar please head over to the How to Build AEM Projects using Apache Maven documentation page.

    Include core components into your own project maven build

    To add core components to your project, you will need to add it to your maven build. The released version of the framework are available on the public maven repository at https://repo1.maven.org/maven2/design/aem/aemdesign-aem-support-deploy/

    To include the deploy package into your own project’s maven build using maven you can add the dependency to your pom.xml like this

    <dependency>
        <groupId>design.aem</groupId>
        <artifactId>aemdesign-aem-support-deploy</artifactId>
        <type>zip</type>
        <version>2.0.100</version>
    </dependency>
    

    and then add this subpackage to your sub package section

     <subPackage>
         <groupId>design.aem</groupId>
         <artifactId>aemdesign-aem-support-deploy</artifactId>
         <filter>true</filter>
     </subPackage>
    

    inside the configuration of the content-package-maven-plugin.

    Development Notes

    Following section describes some of the development topics

    Release Versions

    Release versions are automated and based on Tags and Commit count from Tag using the git describe command

    To test git versioning run

    git describe

    this will show you generated version message with latest tag and how many commits since tag.

    If you get an error:

    fatal: No annotated tags can describe

    create or overwrite an existing tag with a message:

    git tag 1.0 1.0^{} -f -m "initial tag"

    Version Convention

    Version numbers for Git Tags should follow semver format:

    • MAJOR version when you make incompatible API changes,
    • MINOR version when you add functionality in a backwards-compatible manner, and
    • PATCH version is automatically generated based on git commit count from last Tag

    Please use MAJOR and MINOR version in Tags, PATCH version will be automatically added as a commit count since the last tag using the git describe.

    Release history

    Please review Versions for all version history

    Visit original content creator repository
  • oui-lookup

    MAC address OUI lookup script

    Recipe for a self-contained script to look up OUIs.

    Simply:

    make
    

    This will create a oui-lookup.sh script. The script comes with a greppable OUI
    database appended to itself and requires no external dependencies to run, aside
    from standard Unix utilities.

    To generate the script and also install it locally as oui-lookup:

    make install                    # will install at ~/.local/bin
    

    To choose a custom install prefix:

    PREFIX=/usr/local make install  # will install at /usr/local/bin
    

    Usage

    To search for a prefix, use hexadecimal notation. Regexps are not accepted.

    % oui-lookup 001122
    001122  CIMSYS Inc
    

    The prefix needs not be 3 octets long. It can be shorter, which will match many
    entries. Or it can be longer, so you can mindlessly pass full addresses.

    # Full address search.
    % oui-lookup 001122334455
    001122  CIMSYS Inc
    
    # Shorter prefix search.
    % oui-lookup 001 | sort | head
    001000  CABLE TELEVISION LABORATORIES, INC.
    001001  Citel
    001002  ACTIA
    001003  IMATRON, INC.
    001004  THE BRANTLEY COILE COMPANY,INC
    001005  UEC COMMERCIAL
    001006  Thales Contact Solutions Ltd.
    001007  Cisco Systems, Inc
    001008  VIENNA SYSTEMS CORPORATION
    001009  HORANET
    

    The format accepts common separators between any two octets.

    % oui-lookup 00-11-22-33-44-55
    001122  CIMSYS Inc
    % oui-lookup 00:11:22:33:44:55
    001122  CIMSYS Inc
    % oui-lookup 0011.2233.4455
    001122  CIMSYS Inc
    % oui-lookup 0011.22-3344:55
    001122  CIMSYS Inc
    

    You can also search by organization. Regexps are accepted in this case, and
    they are implicitly case-insensitive and left-anchored.

    % oui-lookup -O xerox | sort | head -n3
    000000  XEROX CORPORATION
    000001  XEROX CORPORATION
    000002  XEROX CORPORATION
    
    % oui-lookup -O corp
    8427CE  Corporation of the Presiding Bishop of The Church of Jesus Christ of Latter-day Saints
    28CCFF  Corporacion Empresarial Altra SL
    00C0B5  CORPORATE NETWORK SYSTEMS,INC.
    
    # Explicitly right-anchored using .* and $.
    % oui-lookup -O '.*[ ]spa$' | sort | head -n3
    00020A  Gefran Spa
    000313  Access Media SPA
    000350  BTICINO SPA
    

    Update the OUI database

    To update the script to the latest OUI database available from the Internet:

    make -B
    

    To update and reinstall in one step:

    make -B install
    

    Pre-compiled

    You can find a pre-compiled but not up-to-date copy of oui-lookup.sh in
    the releases page.

    Copying

    Public Domain.

    Visit original content creator repository

  • would-you-rather

    Would You Rather

    Netlify Status

    Would You Rather is a Questionnaire App that allows you to ask and answer questions about what you rather between only two options, you can answer your own question or any other user’s question, add and ask a new question to other users, also you can access the leaderboard page to see the active state of the users according to their score.

    You can view the App from here

    Screenshot

    Demo

    would-you-rather-ask-answer-quetions-google-chrome-2021-09-07-21-25-49_P1qz9veA.mp4

    Instructions, Building & Get Started

    - 1- Fork, clone or download this repository to your local machine.
    - 2- Be sure that you install the Node.js environment in your machine.
    - 3- Open your terminal and be sure that you are inside the correct destination of the App, while you must be in the same path of the package.json file.
    - 4- Inside your terminal run these commands:-
    
        * to install dependencies.
        ```
        npm install
        ```
        * to start the server.
        ```
        npm start
        ```
    - 5- Once the App server is running, visit (localhost:3000) in the browser to view the App and now you can treat with it as shown above in the Demo.
    - 6- You can also see a live preview of the App from this Link (https://would-you-rather14.netlify.app/)
    

    Pages

    • Login
    • Dashboard
    • Leaderboard
    • New Question
    • Question
    • 404

    Built with

    • HTML
    • CSS
    • JS

    Libraries & Packages

    Frameworks

    Notices & Overview about the App

    • This App is a practical project from Udacity Course Nanodegree Program – Web Development Advanced Track

    • The App depends on a fake static database, using customized methods to send requests and get questions from this database.

    • You have the ability to login with the option of 3 users in the login form, and you have to choose one user to be able to access the internal pages of the App.

    • The App contains of 404 page which will be rendered if the user tries to access a not available page.

    • Due to dealing with fake static database, so if you try to reload the App at any time, your progress in the App about adding or answering questions will be lost, and the data will be reset to its initial state.

    • The _DATA.js file represents the fake static database and the methods that let you access this database.

    • There are two types of objects stored in the fake static database: [Questions & Users]

    • The App contacts with the database via 4 methods:

      • _getUsers()
      • _getQuestions()
      • _saveQuestion(question)
      • _saveQuestionAnswer(object)

      1. _getUsers() Method: Description: Get all of the existing users from the database.
        Return Value: Object where the key is the user’s id and the value is the user object.

      2. _getQuestions() Method: Description: Get all of the existing questions from the database.
        Return Value: Object where the key is the question’s id and the value is the question object.

      3. _saveQuestion(question) Method: Description: Save the polling question in the database.
        Parameters: Object that includes the following properties: author, optionOneText, and optionTwoText. Return Value: An object that has the following properties: id, author, optionOne, optionTwo, timestamp.

      4. _saveQuestionAnswer(object) Method: Description: Save the answer to a particular polling question in the database. Parameters: Object that contains the following properties: authedUser, qid, and answer.

    • Finally, you can consider this App as a reference and strong practical & revision to understand the working logic of redux, react-redux & middleware like redux-thunk and how they interact with a react App.

    Certificate

    Course Certificate

    Author

    Contact me through my social accounts

    License

    Licensed under the MIT License

    Visit original content creator repository
  • conflict-juggler.nvim

    conflict-juggler.nvim

    This project took inspiration from the VSCode extension Conflict Squeezer.

    Over the years working with Git, I’ve had to resolve many merge conflicts. When I used VSCode, the Conflict Squeezer extension saved me a lot of time on the more challenging merge conflicts. After moving on to Neovim, I started missing this functionality so much that I decided to rewrite it. One late night later and a bit less hair on my head, here it is!

    Features

    This plugin creates a command called ConflictJuggler that:

    • Scans the current buffer and removes the conflict markers when both sides of the conflict are the same.

    • Simplifies the conflict when the start or the end are the same, moving the matching lines out of the block.

    • Supports nested conflict markers (WOW! 🤩)

    Installation

    You can install this plugin with the plugin manager of your choice. Here are a few examples:

    Lazy

    { 'pv-hernandez/conflict-juggler.nvim' }

    Plug

    Plug 'pv-hernandez/conflict-juggler.nvim'

    Usage

    To use this plugin you just need to run the command :ConflictJuggler on a buffer with conflict markers. The conflict block will get simplified.

    The conflict below:

    <<<<<<< HEAD
    aaa
    bbb
    =======
    bbb
    >>>>>>> remote
    

    Becomes:

    <<<<<<< HEAD
    aaa
    =======
    >>>>>>> remote
    bbb
    

    The strategy is to make both sides of the conflict match so that the lines get moved by the plugin. So say we want the final file to have the “aaa” line. We add that line to the “remote” part of the conflict:

    <<<<<<< HEAD
    aaa
    =======
    aaa
    >>>>>>> remote
    bbb
    

    And run the command again:

    aaa
    bbb
    

    This is a small example but it get really useful when the conflict blocks span tens or hundreds of lines, most of them are the same with indentation changes or some other small change that is hard to spot quickly.

    Real world example

    A Flutter project is an example of code base where this kind of conflict happens frequently, because of the amount of nested objects you create. In this example one change added a Theme around the widget tree, and another change added a Column around the widget tree. The entire tree got indented by a different amount in each change, so the conflict block spans the entire build method:

    Widget build(BuildContext context) {
    <<<<<<< HEAD
        return Theme(
            data: ...,
            child: A(
                child: B(
                    children: [
                        C(),
                        // Many items
                        C(),
                    ],
                ),
            ),
    |||||||
        return A(
            child: B(
                children: [
                    C(),
                    // Many items
                    C(),
                ],
            ),
    =======
        return Column(
            children: [
                A(
                    child: B(
                        children: [
                            C(),
                            // Many items
                            C(),
                        ],
                    ),
                ),
            ],
    >>>>>>> remote
        );
    }

    It is difficult to know if there are more changes in the middle of the widget tree by just looking at the conflict block, so we make the start and the end of the changes the same and run the command :ConflictJuggler:

    Widget build(BuildContext context) {
    <<<<<<< HEAD
        return Theme(
            data: ...,
            child: Column(
                children: [
                    A(
                        child: B(
                            children: [
                                C(),
                                // Many items
                                C(),
                            ],
                        ),
                    ),
                ],
            ),
    |||||||
        return A(
            child: B(
                children: [
                    C(),
                    // Many items
                    C(),
                ],
            ),
    =======
        return Theme(
            data: ...,
            child: Column(
                children: [
                    A(
                        child: B(
                            children: [
                                C(),
                                // Many items
                                C(),
                            ],
                        ),
                    ),
                ],
            ),
    >>>>>>> remote
        );
    }

    Widget build(BuildContext context) {
        return Theme(
            data: ...,
            child: Column(
                children: [
                    A(
                        child: B(
                            children: [
                                C(),
    <<<<<<< HEAD
                                // Many items
    |||||||
        return A(
            child: B(
                children: [
                    C(),
                    // Many items
                    C(),
                ],
            ),
    =======
                                // Many items
    >>>>>>> remote
                                C(),
                            ],
                        ),
                    ),
                ],
            ),
        );
    }

    The conflict makers move closer together, around one part of the widget tree that is different between both sides. Now you can keep making both sides match and running the command until the conflict is gone.

    This process avoids missing on small changes in the middle of the conflict block.

    If you like this plugin, don’t forget to share it with others!

    Visit original content creator repository

  • matryoshka-mm

    🌋 M3: Matryoshka Multimodal Models

    Learning multi-granularities visual tokens a coarse-to-fine nested way
    Mu Cai, Jianwei Yang, Jianfeng Gao , Yong Jae Lee

    Proceedings of the International Conference on Learning Representations (ICLR), 2025

    [Paper] [Project Page] [Demo] [Model Zoo]

    Release

    • [6/3] 🔥 All training (llava-1.5-m3) and evaluations (llava-1.5-m3 and llava-next-m3) code are release.
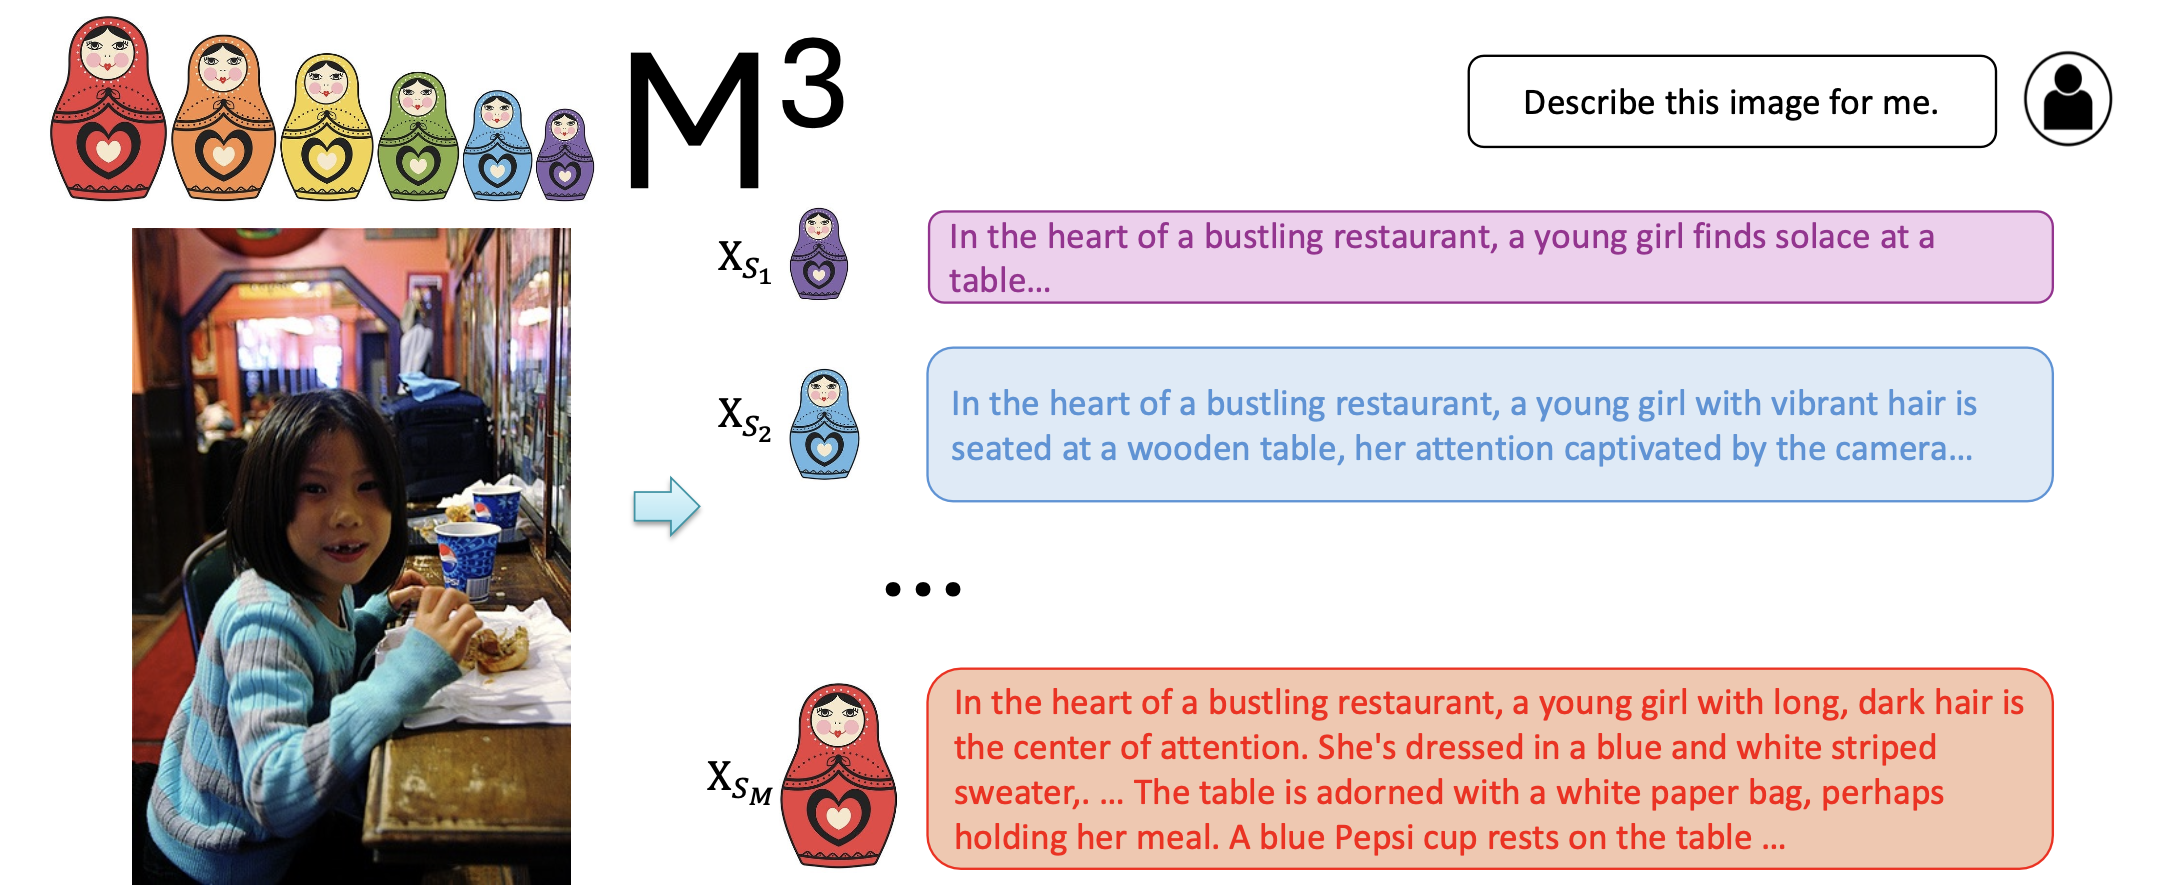
    • [5/27] 🔥 We released Matryoshka Multimodal Models. We propose to learn visual tokens in a nested manner following a coarse-to-fine order. Checkout the paper and demo.

    The fundamental implementation of M3 can be found in this code snippet.

    Code License Usage and License Notices: This project utilizes certain datasets and checkpoints that are subject to their respective original licenses. Users must comply with all terms and conditions of these original licenses, including but not limited to the OpenAI Terms of Use for the dataset and the specific licenses for base language models for checkpoints trained using the dataset (e.g. Llama community license for LLaMA-2 and Vicuna-v1.5). This project does not impose any additional constraints beyond those stipulated in the original licenses. Furthermore, users are reminded to ensure that their use of the dataset and checkpoints is in compliance with all applicable laws and regulations.

    Contents

    Install

    If you are not using Linux, do NOT proceed, see instructions for macOS and Windows.

    1. Clone this repository and navigate to LLaVA folder
    git clone https://github.com/mu-cai/matryoshka-mm.git
    cd matryoshka-mm
    1. Install Package
    conda create -n matryoshka-mm python=3.10 -y
    conda activate matryoshka-mm
    pip install --upgrade pip  # enable PEP 660 support
    pip install -e .
    1. Install additional packages for training cases
    pip install -e ".[train]"
    pip install flash-attn --no-build-isolation
    

    Quick Start With HuggingFace

    Example Code
    from llava.model.builder import load_pretrained_model
    from llava.mm_utils import get_model_name_from_path
    from llava.eval.run_llava import eval_model
    
    model_path = "mucai/llava-next-vicuna-7b-m3"
    
    tokenizer, model, image_processor, context_len = load_pretrained_model(
        model_path=model_path,
        model_base=None,
        model_name=get_model_name_from_path(model_path)
    )

    Check out the details wth the load_pretrained_model function in llava/model/builder.py.

    You can also use the eval_model function in llava/eval/run_llava.py to get the output easily. By doing so, you can use this code on Colab directly after downloading this repository.

    model_path = "mucai/llava-next-vicuna-7b-m3"
    prompt = "What are the things I should be cautious about when I visit here?"
    image_file = "https://llava-vl.github.io/static/images/view.jpg"
    
    args = type('Args', (), {
        "model_path": model_path,
        "model_base": None,
        "model_name": get_model_name_from_path(model_path),
        "query": prompt,
        "conv_mode": None,
        "image_file": image_file,
        "sep": ",",
        "temperature": 0,
        "top_p": None,
        "num_beams": 1,
        "max_new_tokens": 512,
        "matryoshka_vis_token_scale": 576,
    })()
    
    eval_model(args)

    M3 Weights

    Please check out our Model Zoo for all public M3 checkpoints, and the instructions of how to use the weights.

    Demo

    Gradio Web UI

    To launch a Gradio demo locally, please run the following commands one by one. If you plan to launch multiple model workers to compare between different checkpoints, you only need to launch the controller and the web server ONCE.

    flowchart BT
        %% Declare Nodes
        gws("Gradio (UI Server)")
        c("Controller (API Server):<br/>PORT: 10000")
        mw7b("Model Worker:<br/>llava-next-vicuna-7b-m3<br/>PORT: 40000")
        mw13b("Model Worker:<br/>llava-next-vicuna-7b-m3<br/>PORT: 40001")
        sglw13b("Backend:<br/>llava-v1.5-7b-m3<br/>http://localhost:30000")
        lsglw13b("Worker:<br/>lllava-v1.5-7b-m3<<br/>PORT: 40002")
    
        %% Declare Styles
        classDef data fill:#3af,stroke:#48a,stroke-width:2px,color:#444
        classDef success fill:#8f8,stroke:#0a0,stroke-width:2px,color:#444
        classDef failure fill:#f88,stroke:#f00,stroke-width:2px,color:#444
    
        %% Assign Styles
        class id,od data;
        class cimg,cs_s,scsim_s success;
        class ncimg,cs_f,scsim_f failure;
    
        subgraph Demo Connections
            direction BT
            c<-->gws
            
            mw7b<-->c
            mw13b<-->c
            lsglw13b<-->c
            sglw13b<-->lsglw13b
        end
    
    Loading

    Launch a controller

    python -m llava.serve.controller --host 0.0.0.0 --port 30000

    Launch a gradio web server.

    python -m llava.serve.gradio_web_server --controller http://localhost:30000 --model-list-mode reload

    You just launched the Gradio web interface. Now, you can open the web interface with the URL printed on the screen. You may notice that there is no model in the model list. Do not worry, as we have not launched any model worker yet. It will be automatically updated when you launch a model worker.

    Launch a model worker

    This is the actual worker that performs the inference on the GPU. Each worker is responsible for a single model specified in --model-path.

    python -m llava.serve.model_worker --host 0.0.0.0 --controller http://localhost:30000 --port 40000 --worker http://localhost:40000 --model-path mucai/llava-next-vicuna-7b-m3

    Wait until the process finishes loading the model and you see “Uvicorn running on …”. Now, refresh your Gradio web UI, and you will see the model you just launched in the model list.

    You can launch as many workers as you want, and compare between different model checkpoints in the same Gradio interface. Please keep the --controller the same, and modify the --port and --worker to a different port number for each worker.

    python -m llava.serve.model_worker --host 0.0.0.0 --controller http://localhost:30000 --port <different from 40000, say 40001> --worker http://localhost:<change accordingly, i.e. 40001> --model-path <ckpt2>

    If you are using an Apple device with an M1 or M2 chip, you can specify the mps device by using the --device flag: --device mps.

    Launch a model worker (Multiple GPUs, when GPU VRAM <= 24GB)

    If the VRAM of your GPU is less than 24GB (e.g., RTX 3090, RTX 4090, etc.), you may try running it with multiple GPUs. Our latest code base will automatically try to use multiple GPUs if you have more than one GPU. You can specify which GPUs to use with CUDA_VISIBLE_DEVICES. Below is an example of running with the first two GPUs.

    CUDA_VISIBLE_DEVICES=0,1 python -m llava.serve.model_worker --host 0.0.0.0 --controller http://localhost:30000 --port 40000 --worker http://localhost:40000 --model-path mucai/llava-next-vicuna-7b-m3

    Launch a model worker (4-bit, 8-bit inference, quantized)

    You can launch the model worker with quantized bits (4-bit, 8-bit), which allows you to run the inference with reduced GPU memory footprint, potentially allowing you to run on a GPU with as few as 12GB VRAM. Note that inference with quantized bits may not be as accurate as the full-precision model. Simply append --load-4bit or --load-8bit to the model worker command that you are executing. Below is an example of running with 4-bit quantization.

    python -m llava.serve.model_worker --host 0.0.0.0 --controller http://localhost:30000 --port 40000 --worker http://localhost:40000 --model-path mucai/llava-next-vicuna-7b-m3 --load-4bit

    Launch a model worker (LoRA weights, unmerged)

    You can train and launch the model worker with LoRA weights using our instructions here..

    CLI Inference

    Chat about images using LLaVA without the need of Gradio interface. It also supports multiple GPUs, 4-bit and 8-bit quantized inference. With 4-bit quantization, for our LLaVA-1.5-7B, it uses less than 8GB VRAM on a single GPU.

    python -m llava.serve.cli \
        --model-path mucai/llava-next-vicuna-7b-m3 \
        --image-file "https://llava-vl.github.io/static/images/view.jpg" \
        --matryoshka_vis_token_scale 576 \
        --load-4bit

    Train (with LLaVA-1.5)

    M3 finetunes LLaVA checkpoints using the exact same visual instruction data.

    LLaVA is trained on 8 H100 GPUs with 80GB memory. To train on fewer GPUs, you can reduce the per_device_train_batch_size and increase the gradient_accumulation_steps accordingly. Always keep the global batch size the same: per_device_train_batch_size x gradient_accumulation_steps x num_gpus.

    Hyperparameters

    We use the exact same hyperparameters as LLaVA in finetuning. Hyperparameters used are provided below.

    Hyperparameter Global Batch Size Learning rate Epochs Max length Weight decay
    LLaVA-v1.5-7B-M3 128 2e-5 1 2048 0

    Download Vicuna checkpoints (automatically)

    Our base model Vicuna v1.5, which is an instruction-tuned chatbot, will be downloaded automatically when you run our provided training scripts. No action is needed.

    M3 Visual Instruction Tuning

    1. Prepare data

    Please download the annotation of the final mixture our instruction tuning data llava_v1_5_mix665k.json, and download the images from constituting datasets:

    After downloading all of them, organize the data as follows in ./playground/data,

    ├── coco
    │   └── train2017
    ├── gqa
    │   └── images
    ├── ocr_vqa
    │   └── images
    ├── textvqa
    │   └── train_images
    └── vg
        ├── VG_100K
        └── VG_100K_2
    
    1. Start training!

    You may download our pretrained projectors in Model Zoo. It is not recommended to use legacy projectors, as they may be trained with a different version of the codebase, and if any option is off, the model will not function/train as we expected.

    Training script with DeepSpeed ZeRO-3: finetune.sh.

    If you are do not have enough GPU memory:

    • Use LoRA: finetune_lora.sh. We are able to fit 13B training in 8-A100-40G/8-A6000, and 7B training in 8-RTX3090. Make sure per_device_train_batch_size*gradient_accumulation_steps is the same as the provided script for best reproducibility.
    • Replace zero3.json with zero3_offload.json which offloads some parameters to CPU RAM. This slows down the training speed.

    If you are interested in finetuning M3 model to your own task/data, please check out Finetune_Custom_Data.md

    Evaluation

    We use the same benchmark as LLaVA-1.5 and LLaVA-Next

    For LLaVA-1.5, see Evaluation.md.

    For LLaVA-NeXT on image understanding, see lmms-eval.

    For LLaVA-NeXT on video understanding, see IG-VLM.

    Citation

    If you find LLaVA useful for your research and applications, please cite using this BibTeX:

    @article{cai2024matryoshka,
      title={Matryoshka Multimodal Models},
      author={Cai, Mu and Yang, Jianwei and Gao, Jianfeng and Lee, Yong Jae},
      journal={Proceedings of the International Conference on Learning Representation},
      year={2025}
    }

    Acknowledgement

    • Vicuna: the langauge model we built upon, and our base model Vicuna-13B that has the amazing language capabilities!

    • LLaVa: the codebase we built upon, which has amazing multimodal abalities!

    Related Projects

    Visit original content creator repository
  • JavaScript-Fundamentals

    👨‍🎓For the course

    With “Programming Fundamentals”, students begin to study SoftUni’s in-house program for the comprehensive training of software engineers. The course examines fundamental concepts in programming, which are the basis for effective and quality training in the professional modules. Learners build on the knowledge gained in the Programming Basics course and begin to use more complex programming concepts and structures such as: arrays, sheets, objects and classes. Additional technologies needed by every software developer are studied, such as HTML and CSS, HTTP, bitwise operations, and more. The basics of web development are considered, as well as one of the most common technologies and tools, with which the course successfully builds an idea among students about the upcoming professional modules and knowledge, that they will acquire from them to become successful software developers.

    📑 Themes

    1. Basic Syntax, Conditional Statements and Loops
      • Introduction and IDE
      • JavaScript Syntax
      • Conditional Statements
      • Loops (while and for Loops)
      • Debugging and troubleshooting
    2. Git and GitHub
      • Software Configuration Management
      • Introduction to Git
      • Introduction to GitHub
    3. Data Types and Variables
      • What is Data Type?
      • let vs. var
      • Strings
      • Numbers
      • Booleans
      • typeofOperator
      • Undefined and Null
    4. HTTP Basics
      • HTTP Developer Tools
      • HTML Forms, Request, Response
      • URLs and ERL Structure
    5. Arrays
      • What are Arrays?
      • Array Operations
      • Array Iteration
      • for-of Loop
    6. HTML & CSS Basics
      • Introduction to HTML
      • HTML Common Elements
      • Introduction to CSS
      • Selectors
      • Block Elements
      • Dev Tools
      • Fonts
    7. Functions
      • What is a Function?
      • Declaring and Invoking Functions
      • Nested Functions
      • Value vs Reference Types
      • Arrow Functions
      • Naming and Best Practices
    8. Software Development Concepts – Part 1
      • The 4 Skills of Software Engineers
      • Fundamental Software Engineering Concepts
      • Software Architectures, Front-End and Back-End
    9. Arrays Advanced
      • Array Functionality
      • Array Operations (push, pop, shift, unshift, filtering and transforming elements)
      • Sorting Arrays
    10. Objects and Classes
      • Objects (definition, properties and methods)
      • Reference vs. ValueTypes
      • JSON
      • Classes
    11. Software Development Concepts – Part 2
      • Front-End Development Concepts
      • Back-End Development Concepts
      • Embedded Systems and IoT
      • Software Engineering Concepts
    12. Associative Arrays
      • Associative Arrays (definition, attributes, iteration)
      • Map (methods, iteration)
      • Set (methods, iteration)
    13. Bitwise Operations
      • What is a Bit, Byte, KB, MB?
      • Numeral Systems
      • Representation of Data in Computer Memory
    14. Text Processing
      • Strings
      • Manipulating Strings (Concatenating, Searching, Substring, Splitting, Replacing)
    15. Problem Solving
      • Fundamental Skills of Software Engineers
      • Problems: Definition and Problem Solving
      • Stages of Problem Solving
      • Solving Exam Problems
    16. Regular Expressions
      • Regular Expressions (Definition and Pattern, Predefined Character Classes)
      • Quantifiers and Grouping
      • Backreferences
    17. Database Basics
      • Introduction to Databases
      • SQL vs. NoSQL Databases
      • DBMS Systems
      • Relational Databases, SQL and MySQL Databases
      • NoSQL Databases and MongoDB
    18. QA Introduction
      • Software Quality Assurance
      • QA Engineers and Responsibilities
      • Bugs and Bug Trackers
      • Testing, Test Types and Test Levels
      • Test Automation, Frameworks and Tools
    19. Basic Web Project
      • Node Modules (HTTP, Creating simple HTTP Server)
      • Express.js Framework
      • MVC
      • MVC with Node, Express.js, Handlebars

    💡 Skills you will acquire

    • Handling the standard functionality of the programming language
    • Basics of web development
    • Understanding the interrelationship between different IT concepts
    • Analysis of complex problems and reduction to computer-executable steps
    • Basic HTML and CSS skills
    • Working with linear data structures

    🎓 Certificate:

    Visit original content creator repository
  • http

    Parable Http

    Workflow Status Latest Stable Version Latest Unstable Version License

    Parable Http is a minimalist Http library used to receive requests and send responses. It is not a full implementation, offering just-enough functionality.

    Install

    Php 8.0+ and composer are required.

    $ composer require parable-php/http

    Usage

    To create a Request object automatically from the server variables, use:

    $request = RequestFactory::createFromServer();

    To create a Request from scratch, use:

    $request = new Request(
        'GET', 
        'http://url.here/path?param=value'
    );

    To set up a minimal response you want to send to the client:

    $response = new Response(200, 'This is the body');

    And to send it, use the Dispatcher:

    $response = new Response(200, 'This is the body');
    $dispatcher = new Dispatcher();
    
    $dispatcher->dispatch($response);

    This will send a response with stat us code 200, with the body set as passed to the Response upon creation.

    API

    Request

    • getMethod(): string – returns GET, POST, etc.
    • getUri(): Uri – return a Uri object representing the uri being requested
    • getRequestUri(): ?string – the path of the Uri
    • getProtocol(): string – the protocol used (i.e. HTTP/1.1)
    • getProtocolVersion(): string – the version part of the protocol (i.e. 1.1)
    • getBody(): ?string – the body of the request, if any
    • getUser(): ?string – the username from the uri
    • getPass(): ?string – the password from the uri
    • isHttps(): bool – whether the request was made over https. This represents a ‘best guess’ based on multiple checks
    • isMethod(string $method): bool – check whether the method matches $method

    From the HasHeaders trait:

    • getHeader(string $header): ?string – get a single header by string, null if non-existing
    • getHeaders(): string[] – get all headers

    Response

    • getBody(): ?string – the body to be sent
    • setBody(string $body): void – set the body as a string
    • prependBody(string $content): void – prepend the value to the body
    • appendBody(string $content): void – append the value to the body
    • getContentType(): string – the content type (i.e. text/html, application/json)
    • setContentType(string $contentType): void – set the content type
    • getProtocol(): string – the protocol to be sent with (i.e. HTTP/1.1)
    • getProtocolVersion(): string – the protocol version (i.e. 1.1)
    • setProtocol(string $protocol): void – set the protocol
    • setHeaders(array $headers): void – set multiple headers, resetting
    • addHeaders(array $headers): void – add multiple headers
    • addHeader(string $header, string $value): void – add single header

    From the HasHeaders trait:

    • getHeader(string $header): ?string – get a single header by string, null if non-existing
    • getHeaders(): string[] – get all headers

    From the HasStatusCode trait:

    • getStatusCode(): int – the status code to be sent (i.e. 200)
    • getStatusCodeText(): ?string – the status code text to be sent (i.e. OK)
    • setStatusCode(int $statusCode): void – set the status code

    Dispatcher

    • dispatch(Response $response): void – dispatch a Response, sending all its content as set
    • dispatchAndTerminate(Response $response, int $exitCode = 0): void – dispatch a Response and terminate, i.e., ending program flow immediately afterwards

    Contributing

    Any suggestions, bug reports or general feedback is welcome. Use github issues and pull requests, or find me over at devvoh.com.

    License

    All Parable components are open-source software, licensed under the MIT license.

    Visit original content creator repository
  • PR3TimeMachine

    PR3TimeMachine

    The Polish Radio Program 3 used to shape music taste of Polish listeners. Founded in 1982 and hosted by Marek Niedzwiecki, the Charts included songs that weren’t aired by any other radio station in Poland.

    This app is meant to be a time machine for all listeners of Polish Radio Program 3, allowing them to listen to the chosen chart songs once again, on Spotify.

    Main functionalities

    • crawling through a website with the charts of Polish Radio Program 3 and scraping the data of all of them
    • writing web scraped data to json file
    • reading json file and finding a chart aired on the date chosen by an user
    • offering user a choice between the nearest dates, if the exact data hasn not been found but it is in the time frame of the charts airing
    • finding Spotify uri-s of all the songs, using multiple queries options to guarantee the best search results
    • creating and saving the playlist on an user’s account

    Used libraries

    • selenium webdriver module # to serve web crawler
    • spotipy # to serve new playlists creation
    • json # to serve json files
    • datetime # to serve date search
    • dotenv # to serve virtual environment variables
    • pathlib # to serve files paths
    • logging # to provide logs
    • os # to serve system system files
    • time # to serve proper web scraping, ensuring that the entire subpages are loaded

    MIT License

    Copyright (c) [2021] [Magdalena N. Pawlowicz m.n.pawlowicz@protonmail.com]

    Permission is hereby granted, free of charge, to any person obtaining a copy of this software and associated documentation files (the “Software”), to deal in the Software without restriction, including without limitation the rights to use, copy, modify, merge, publish, distribute, sublicense, and/or sell copies of the Software, and to permit persons to whom the Software is furnished to do so, subject to the following conditions:

    The above copyright notice and this permission notice shall be included in all copies or substantial portions of the Software.

    THE SOFTWARE IS PROVIDED “AS IS”, WITHOUT WARRANTY OF ANY KIND, EXPRESS OR IMPLIED, INCLUDING BUT NOT LIMITED TO THE WARRANTIES OF MERCHANTABILITY, FITNESS FOR A PARTICULAR PURPOSE AND NONINFRINGEMENT. IN NO EVENT SHALL THE AUTHORS OR COPYRIGHT HOLDERS BE LIABLE FOR ANY CLAIM, DAMAGES OR OTHER LIABILITY, WHETHER IN AN ACTION OF CONTRACT, TORT OR OTHERWISE, ARISING FROM, OUT OF OR IN CONNECTION WITH THE SOFTWARE OR THE USE OR OTHER DEALINGS IN THE SOFTWARE.

    Visit original content creator repository