This repo is following Angular Getting started to learn the basic of Angular and its best practices. Addionally, I made some modification and enhancement to the replica project to put what I’ve learned into practice. Feel free to view and edit on StackBlitz ⚡️.
Add-on Features/Functionalities
Add isEmptyCart method in CartService to able to check if current cart is empty
Add getTotalPrice method in CartService to display total of orders
Add getCartCount and setCartCount in CartService to display cart count in top bar
Conditional template rendering in Cart template based on isEmptyCart
A DynamicBreadcrumbService is added to declaratively specify the breadcrumb label by injecting this service
Unsubscribe subscriptios in ngOnDestroy hook to avoid memory leak issue (credit to Kristiqn Tachev’s comment)
Dynamic Breadcrumb view and service example
Let’s use the example from Angular Getting started example. Next, create a breadcrumb like Products > Phone XL when we in specified product detail page. Notice that the latter part Phone XL actually comes from {{productName}} defines in angular routers. We can go back to products page when Products is clicked.
Structure angular routes and add corresponding breadcrumb properties in the routes’s data. In this case, add breadcrumb: 'Products' to path /products, and breadcrumb: '{{productName}}' to path /products/:productId.
Set the value productName using DynamicBreadcrumbService
exportclassProductDetailsComponentimplementsOnInit{product?: Product;constructor(// other service ...privatedynamicBreadcrumbService: DynamicBreadcrumbService){}ngOnInit(): void{// other code ...// Update breadcrum dynamicallyconstbreadcrumbLabel={productName: this.product?.name};this.dynamicBreadcrumbService.updateBreadCrumbLabels(breadcrumbLabel);}}
Hacktoberfest, in its 8th year, is a month-long celebration of open source software run by DigitalOcean. During the month of October, we invite you to join open-source software enthusiasts, beginners, and the developer community by contributing to open-source projects.
Completing the Challenge
If you have previously never contributed to any open-source software then these steps will help you get started:
Go to Hacktoberfest official website and sign in there using your GitHub.
Install git and setup in your computer. Download and install it from here.
Fork this repository by click the Fork button in the top right of this page or simply click here.
Once it is forked, clone the repository in your computer. For this, copy the URL in the address bar, and use the following command:
git clone url_you_just_copied
Open this cloned repository in your preferred code editor. Also, open a terminal in this directory.
Now type in the following command in the terminal and replace username with your GitHub username.
Now add the above filled block to the array in profiles.json file
Once you have done all this, commit your changes to GitHub. You can do this with the following commands. Make sure you execute them in the precise order one after another in your terminal.
# copy and paste the following in the terminal
git add .# copy and paste the following in the terminal after you have executed the previous command
git commit -m "hacktoberfest contribution"# copy and paste the following in the terminal after you have executed the previous command
git push -u origin your_github_username
Now open the forked repository on your GitHub. You will see a yellow box at the top telling you that some changes are pushed. You will also see a button called Compare & pull request. Click on it.
Now add a title, some description! You have opened a pull request in this repository.
You need to open four valid pull requests in order to complete the challenge. If you have performed the above steps, you have already opened one pull request. And you need only three more.
Note: Those repositories who have hacktoberfest as a label are considered for Hacktoberfest challenge only.
Haste is a CUDA implementation of fused RNN layers with built-in DropConnect and Zoneout regularization. These layers are exposed through C++ and Python APIs for easy integration into your own projects or machine learning frameworks.
Once you have the prerequisites, you can install with pip or by building the source code.
Using pip
pip install haste_pytorch
pip install haste_tf
Building from source
make               # Build everything
make haste         # ;) Build C++ API
make haste_tf      # Build TensorFlow API
make haste_pytorch # Build PyTorch API
make examples
make benchmarks
If you built the TensorFlow or PyTorch API, install it with pip:
If the CUDA Toolkit that you’re building against is not in /usr/local/cuda, you must specify the
$CUDA_HOME environment variable before running make:
CUDA_HOME=/usr/local/cuda-10.2 make
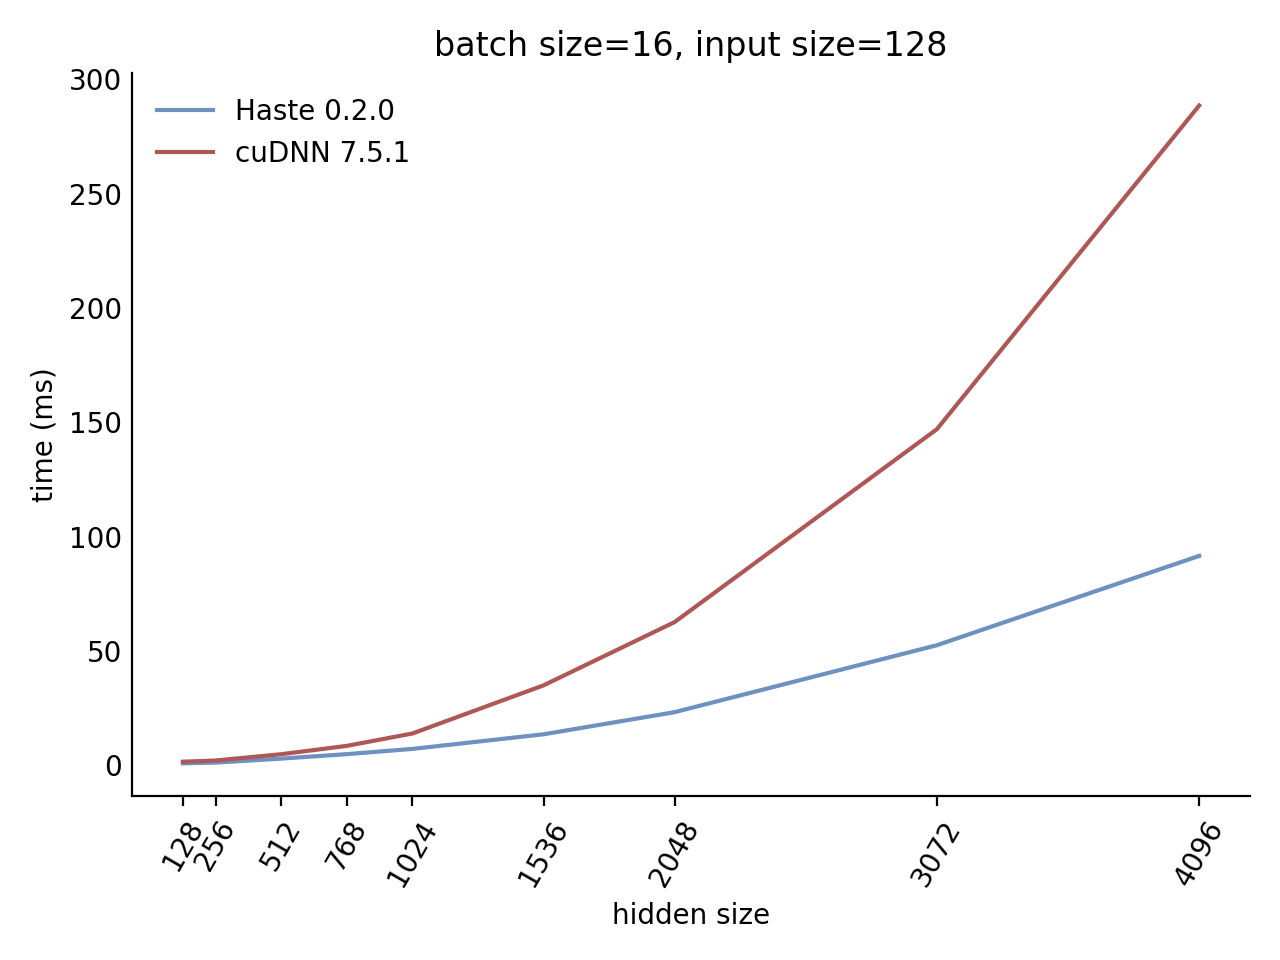
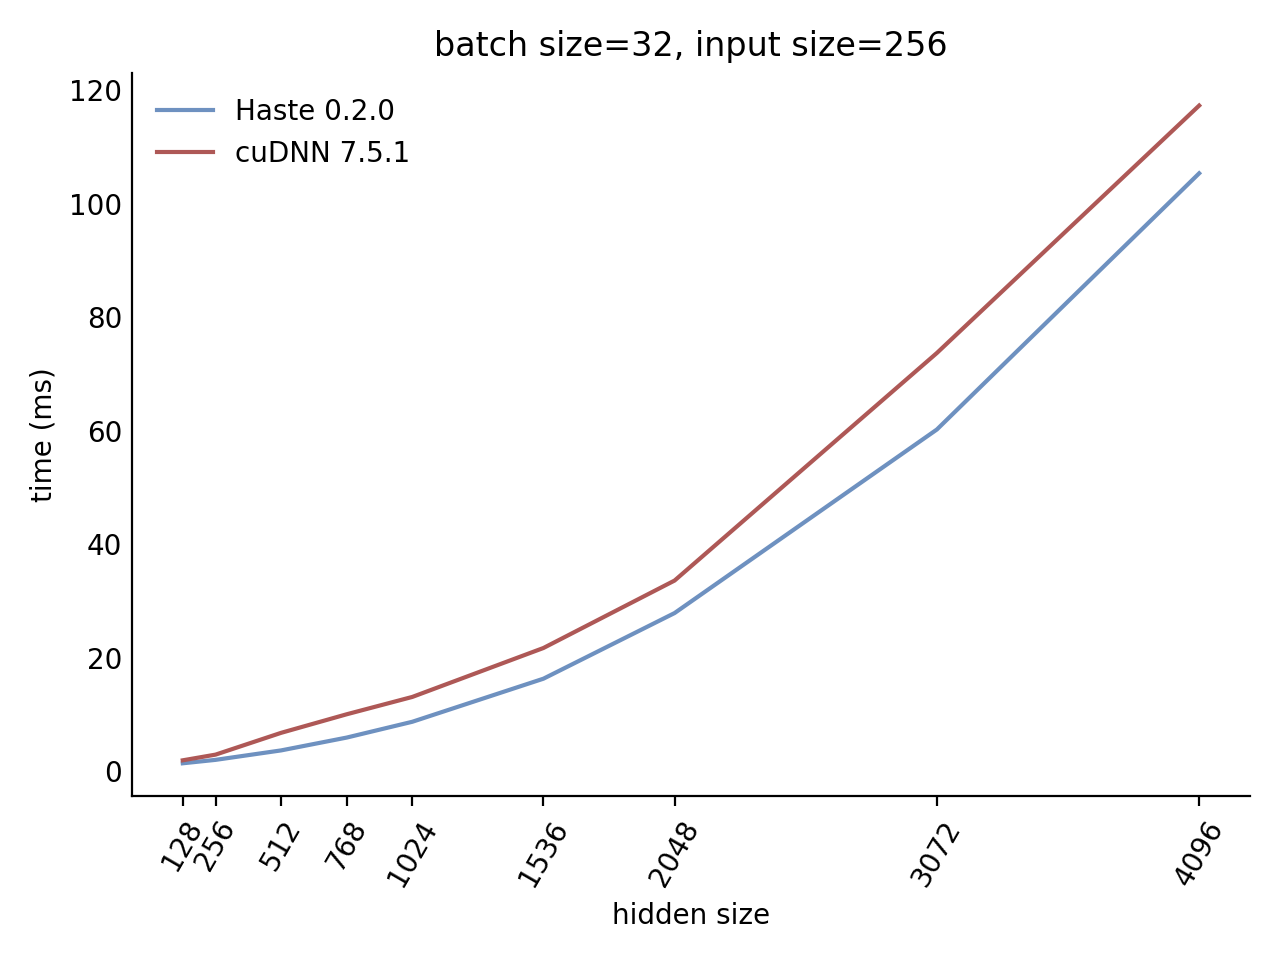
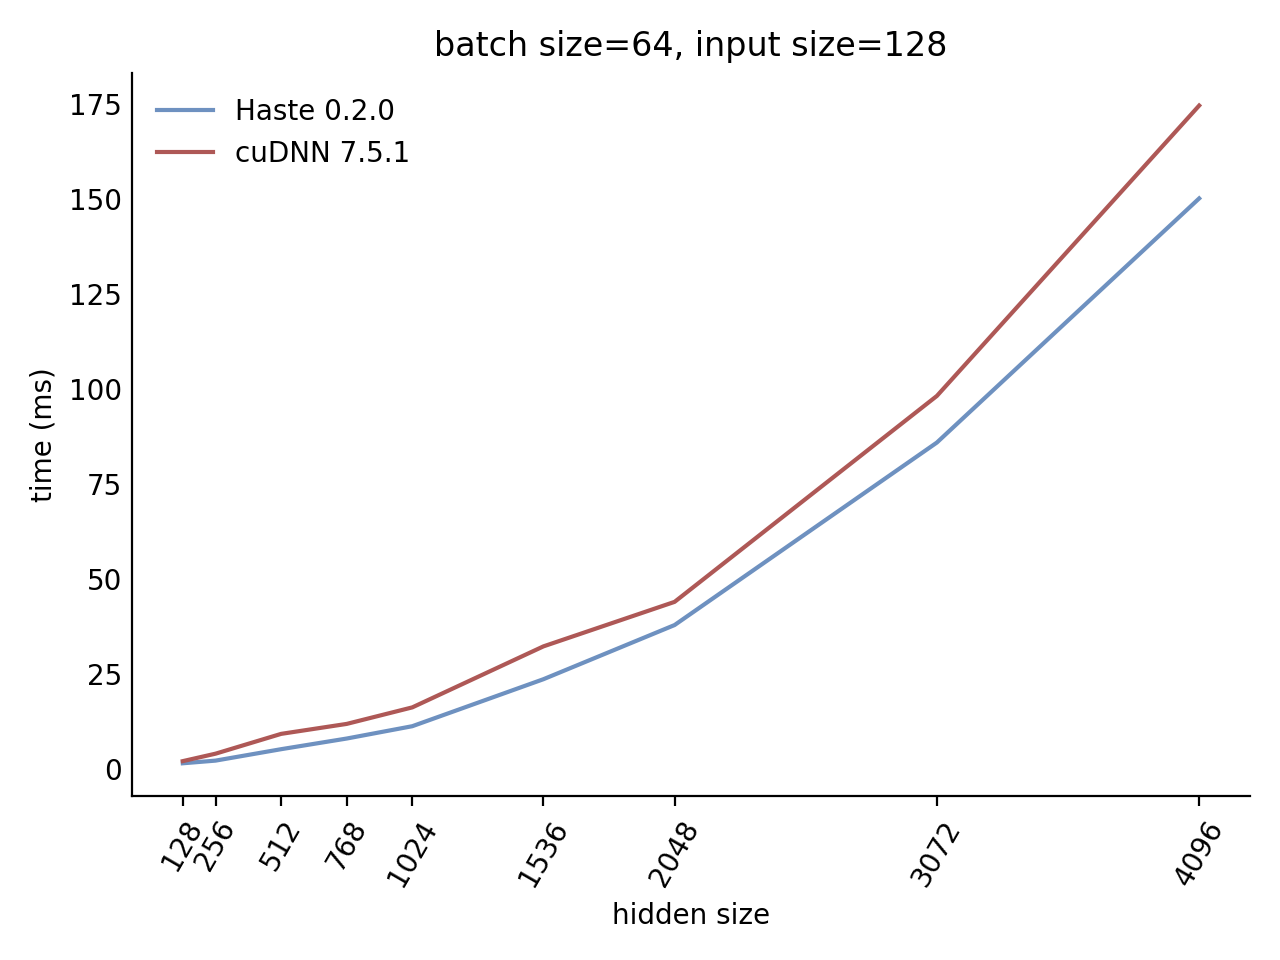
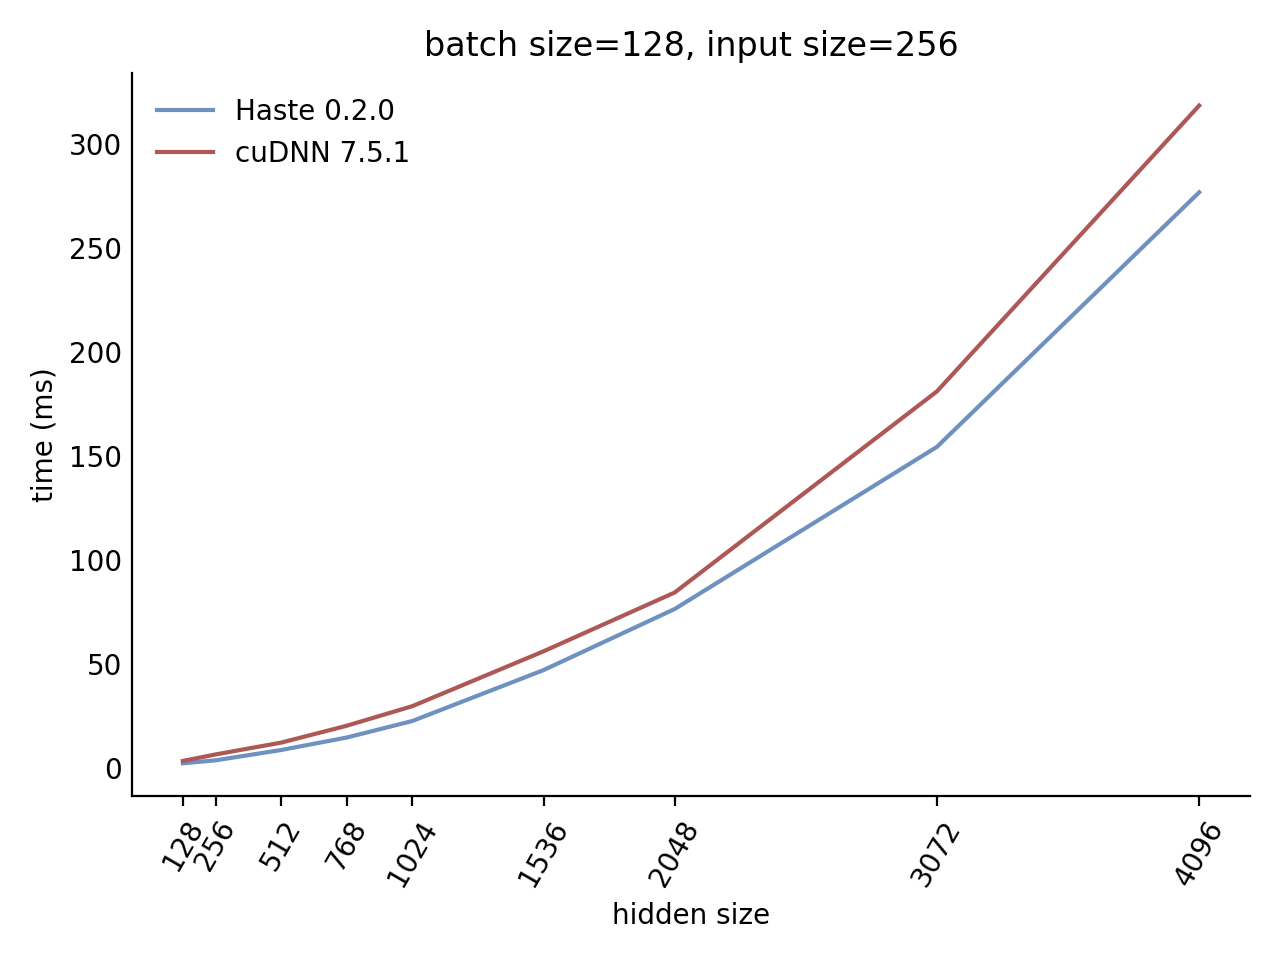
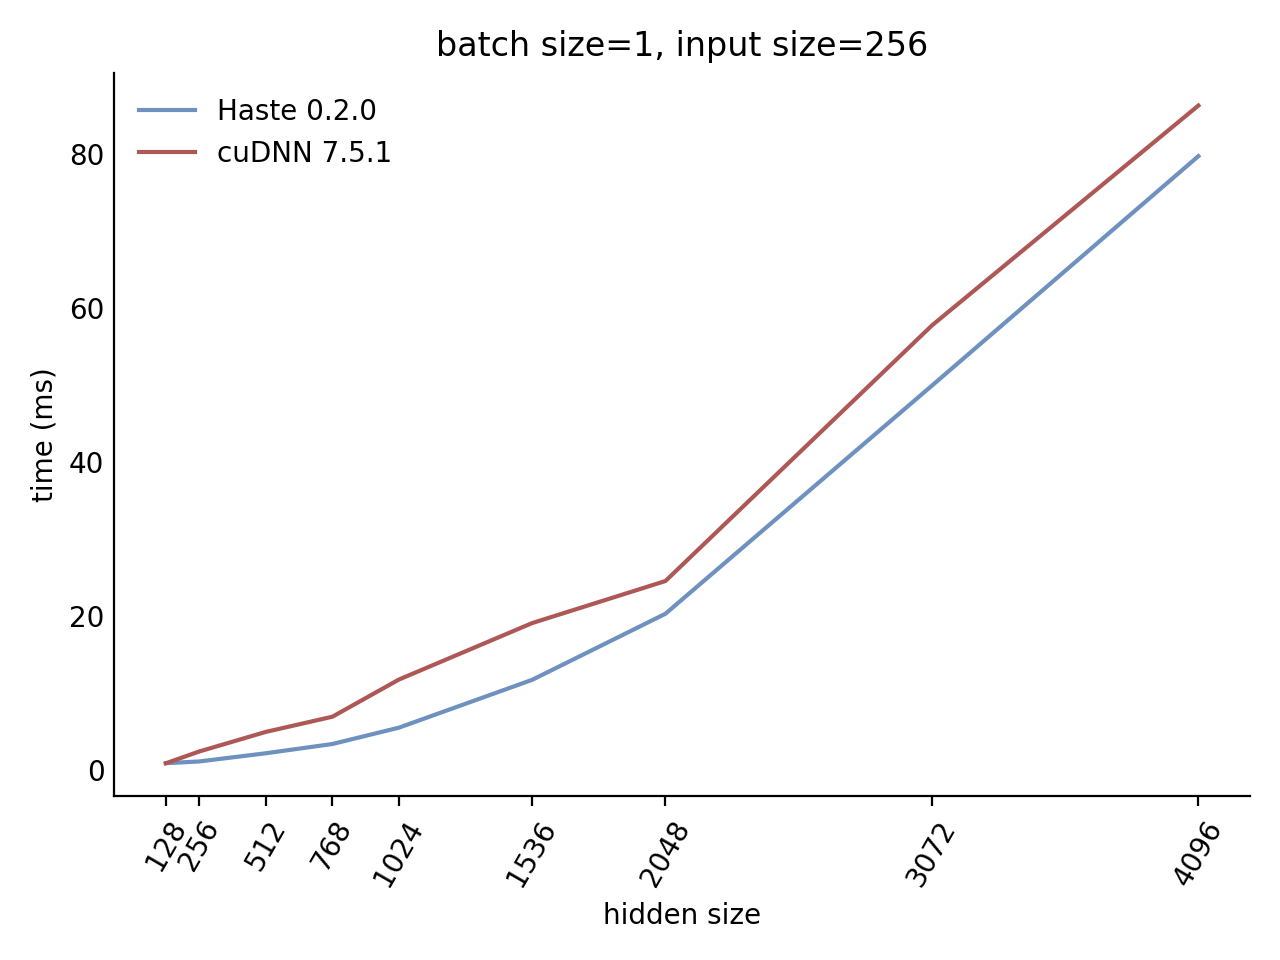
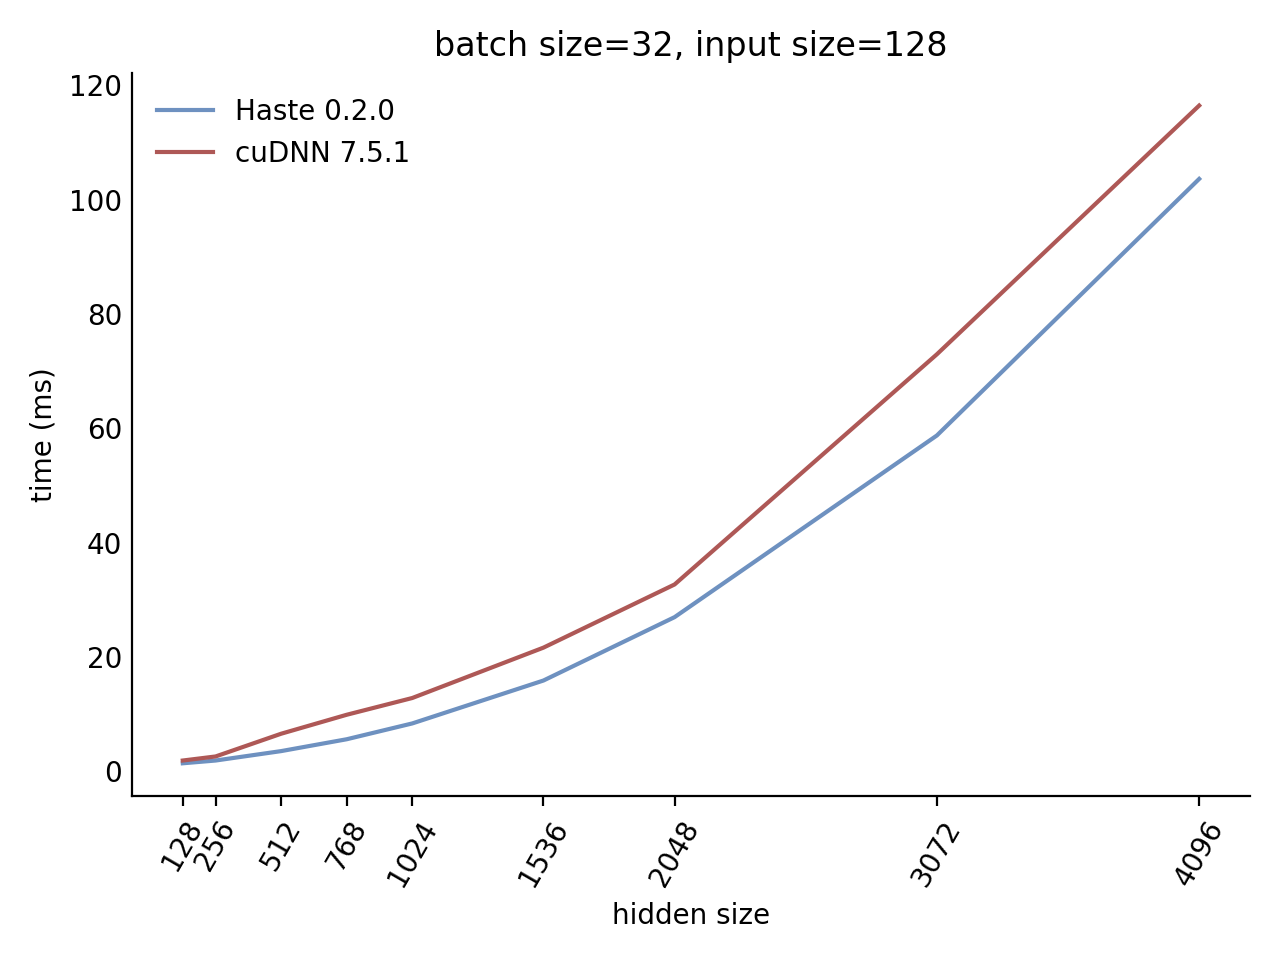
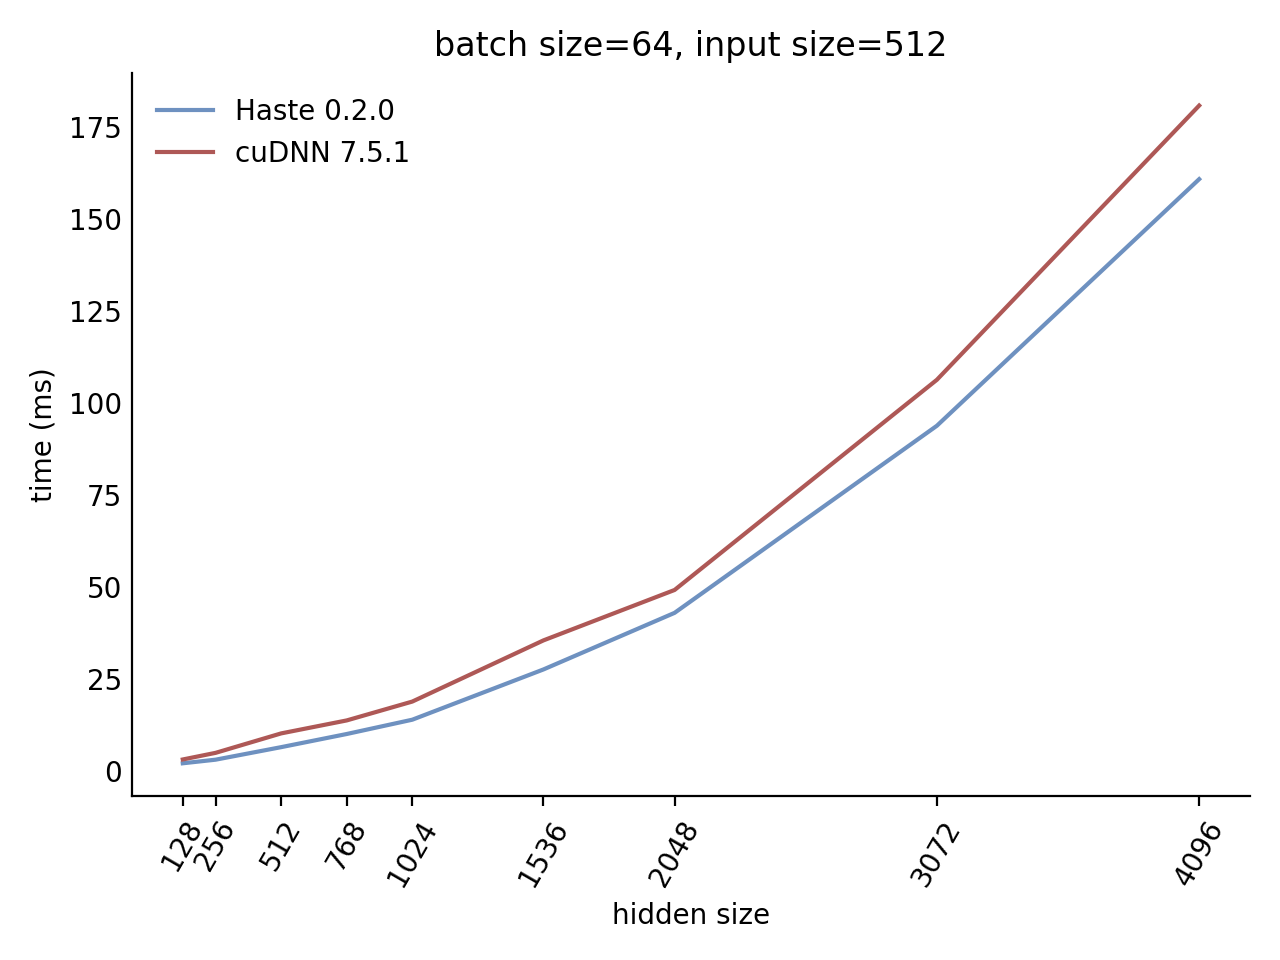
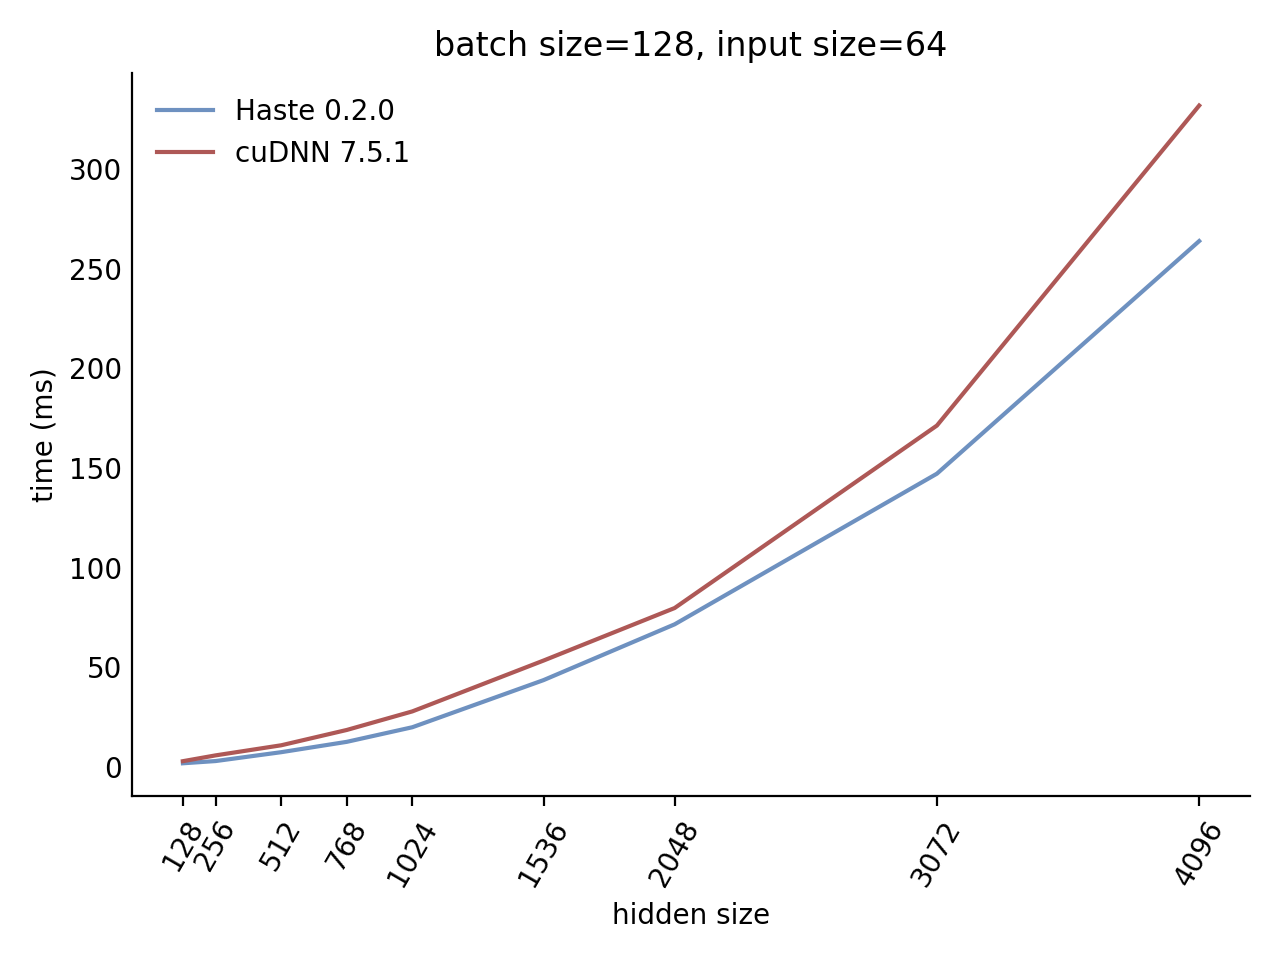
Performance
Our LSTM and GRU benchmarks indicate that Haste has the fastest publicly available implementation for nearly all problem sizes. The following charts show our LSTM results, but the GRU results are qualitatively similar.
importtorchimporthaste_pytorchashastegru_layer=haste.GRU(input_size=128, hidden_size=256, zoneout=0.1, dropout=0.05)
indrnn_layer=haste.IndRNN(input_size=128, hidden_size=256, zoneout=0.1)
lstm_layer=haste.LSTM(input_size=128, hidden_size=256, zoneout=0.1, dropout=0.05)
norm_gru_layer=haste.LayerNormGRU(input_size=128, hidden_size=256, zoneout=0.1, dropout=0.05)
norm_lstm_layer=haste.LayerNormLSTM(input_size=128, hidden_size=256, zoneout=0.1, dropout=0.05)
gru_layer.cuda()
indrnn_layer.cuda()
lstm_layer.cuda()
norm_gru_layer.cuda()
norm_lstm_layer.cuda()
# `x` is a CUDA tensor with shape [T,N,C]x=torch.rand([25, 5, 128]).cuda()
y, state=gru_layer(x)
y, state=indrnn_layer(x)
y, state=lstm_layer(x)
y, state=norm_gru_layer(x)
y, state=norm_lstm_layer(x)
Cho, K., van Merrienboer, B., Gulcehre, C., Bahdanau, D., Bougares, F., Schwenk, H., & Bengio, Y. (2014). Learning Phrase Representations using RNN Encoder-Decoder for Statistical Machine Translation. arXiv:1406.1078 [cs, stat]. http://arxiv.org/abs/1406.1078.
Wan, L., Zeiler, M., Zhang, S., Cun, Y. L., & Fergus, R. (2013). Regularization of Neural Networks using DropConnect. In International Conference on Machine Learning (pp. 1058–1066). Presented at the International Conference on Machine Learning. http://proceedings.mlr.press/v28/wan13.html.
Krueger, D., Maharaj, T., Kramár, J., Pezeshki, M., Ballas, N., Ke, N. R., et al. (2017). Zoneout: Regularizing RNNs by Randomly Preserving Hidden Activations. arXiv:1606.01305 [cs]. http://arxiv.org/abs/1606.01305.
Li, S., Li, W., Cook, C., Zhu, C., & Gao, Y. (2018). Independently Recurrent Neural Network (IndRNN): Building A Longer and Deeper RNN. arXiv:1803.04831 [cs]. http://arxiv.org/abs/1803.04831.
Citing this work
To cite this work, please use the following BibTeX entry:
@misc{haste2020,
  title  = {Haste: a fast, simple, and open RNN library},
  author = {Sharvil Nanavati},
  year   = 2020,
  month  = "Jan",
  howpublished = {\url{https://github.com/lmnt-com/haste/}},
}
PROP, Pre-training with Representative wOrds Prediction, is a new pre-training method tailored for ad-hoc retrieval. PROP is inspired by the classical statistical language model for IR, specifically the query likelihood model, which assumes that the query is generated as the piece of text representative of the “ideal” document. Based on this idea, we construct the representative words prediction (ROP) task for pre-training. The full paper can be found here.
🔥 2022-7 Update: we have uploaded the PROP model to the huggingface model cards 🤗.
🔥 2021-8 Update: we add the B-PROP pre-training in this repo.
We have uploaded three PROP models to the Huggingface Hub, so you can easily use the PROP models with Huggingface/Transformers library.
Model identifier in Huggingface Hub:
xyma/PROP-wiki: The official PROP model pre-trained on Wikipedia and used in our WSDM’2021 paper
xyma/PROP-marco: The official PROP model pre-trained on MS MARCO document corpus and used in our WSDM’2021 paper
xyma/PROP-marco-step400k: PROP model pre-trained on MS MARCO document corpus with more steps and used in MS MARCO Document Ranking Leaderboard
For example,
tokenizer = AutoTokenizer.from_pretrained("xyma/PROP-marco")
model = AutoModel.from_pretrained("xyma/PROP-marco")
Note that if you want to test the zero-shot performance of PROP models, please use this repo or create a PROP model like this since we use a different CLS head with BERT.
The CLS head identifier in PROP model weights is only cls which is a linear module (768, 1).
For example, you can ceate PROP class like the following before fine-tuning,
For Wikipedia, download the dump and extract the text with WikiExtractor.py, and then apply any necessary cleanup (e.g. remove spaces and special characters) to convert it into clean text.
For MS MARCO, download corpus from the official TREC website.
Pre-process data
Compute and store the statistics about tf, df, average_word_num et.al on the whole corpus into Json file. Also, you can use the IR toolkit like lucene to get these info.
Run ./scripts/preprocess.sh to generate the following files:
corpus_df_file.json: {word: document tf}
doc_tf_file.json: {doc_id, doc_tf, doc_word_num}, one document per line
PROP have the same architecture with BERT-Base, and thus you can fine-tune PROP like BERT on any downstream ad-hoc retrieval tasks by just replacing BERT checkpoints with PROP’s.
If you find our work useful, please consider citing our paper:
@article{ma2020prop,
  title={PROP: Pre-training with Representative Words Prediction for Ad-hoc Retrieval},
  author={Ma, Xinyu and Guo, Jiafeng and Zhang, Ruqing and Fan, Yixing and Ji, Xiang and Cheng, Xueqi},
  journal={Proceedings of the 14th ACM International Conference on Web Search and Data Mining},
  year={2021}
}

@article{ma2020bprop,
  title={B-PROP: Bootstrapped Pre-training with Representative Words Prediction for Ad-hoc Retrieval},
  author={Ma, Xinyu and Guo, Jiafeng and Zhang, Ruqing and Fan, Yixing and Ji, Xiang and Cheng, Xueqi},
  journal={Proceedings of the 44th International ACM SIGIR Conference on Research and Development in Information Retrieval},
  year={2021}
}
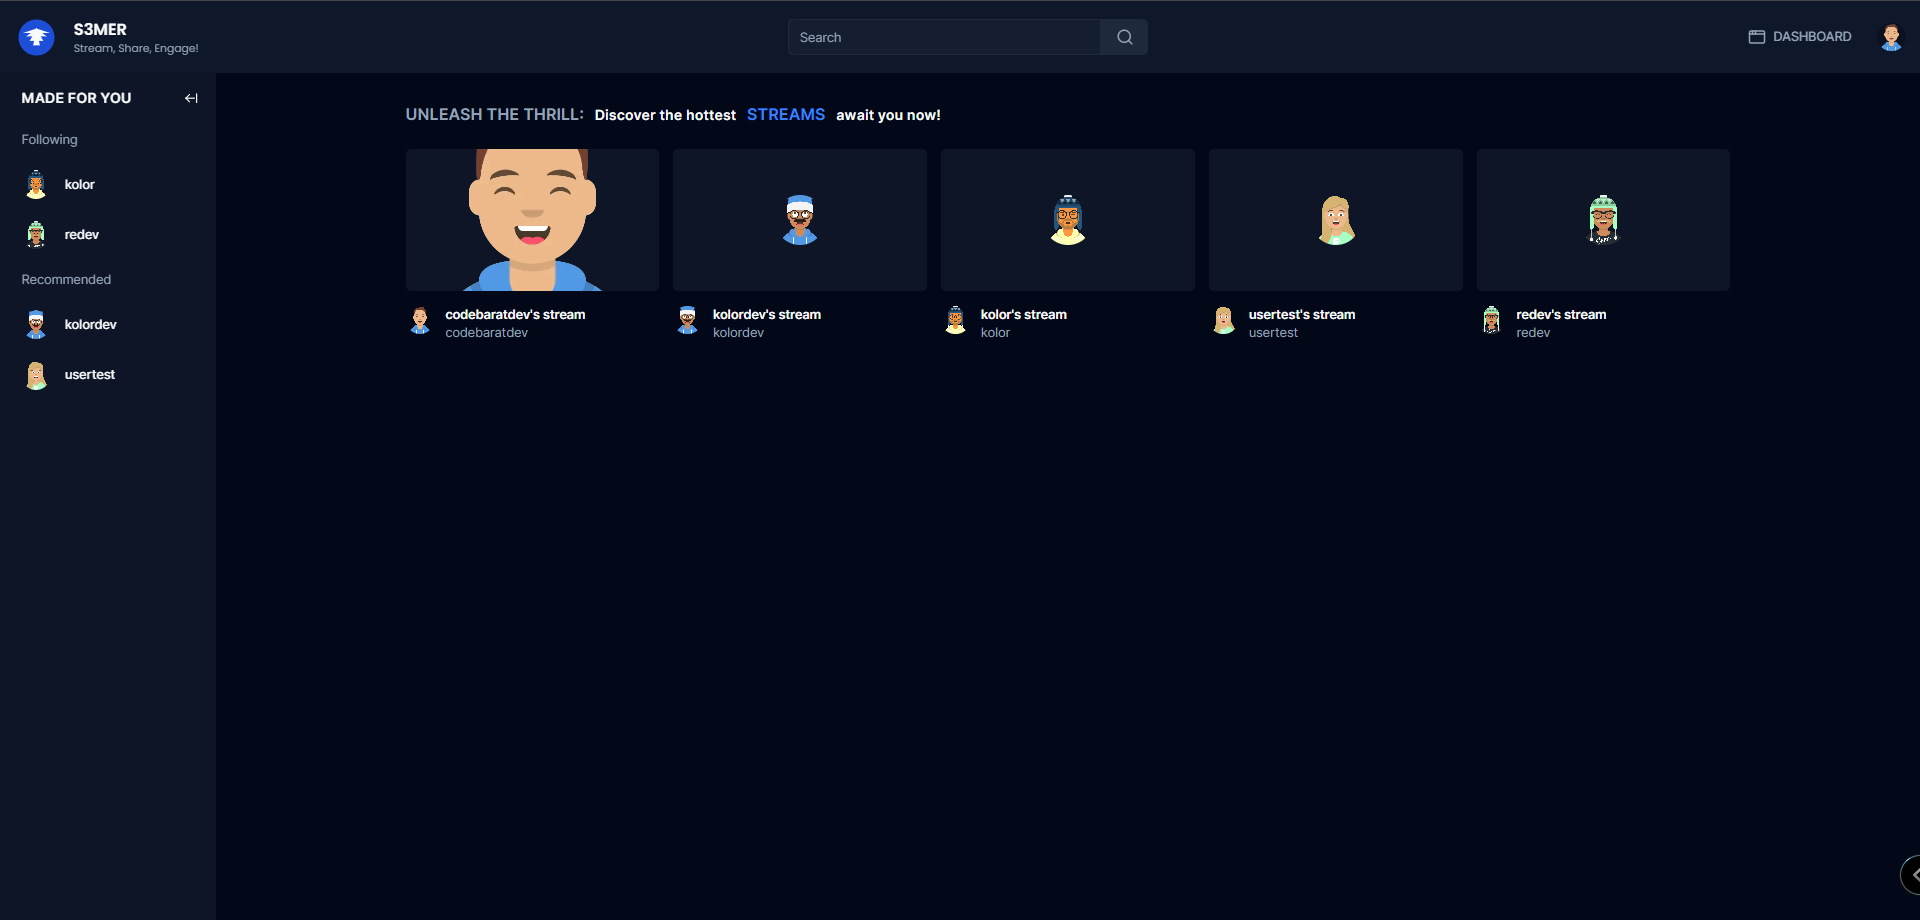
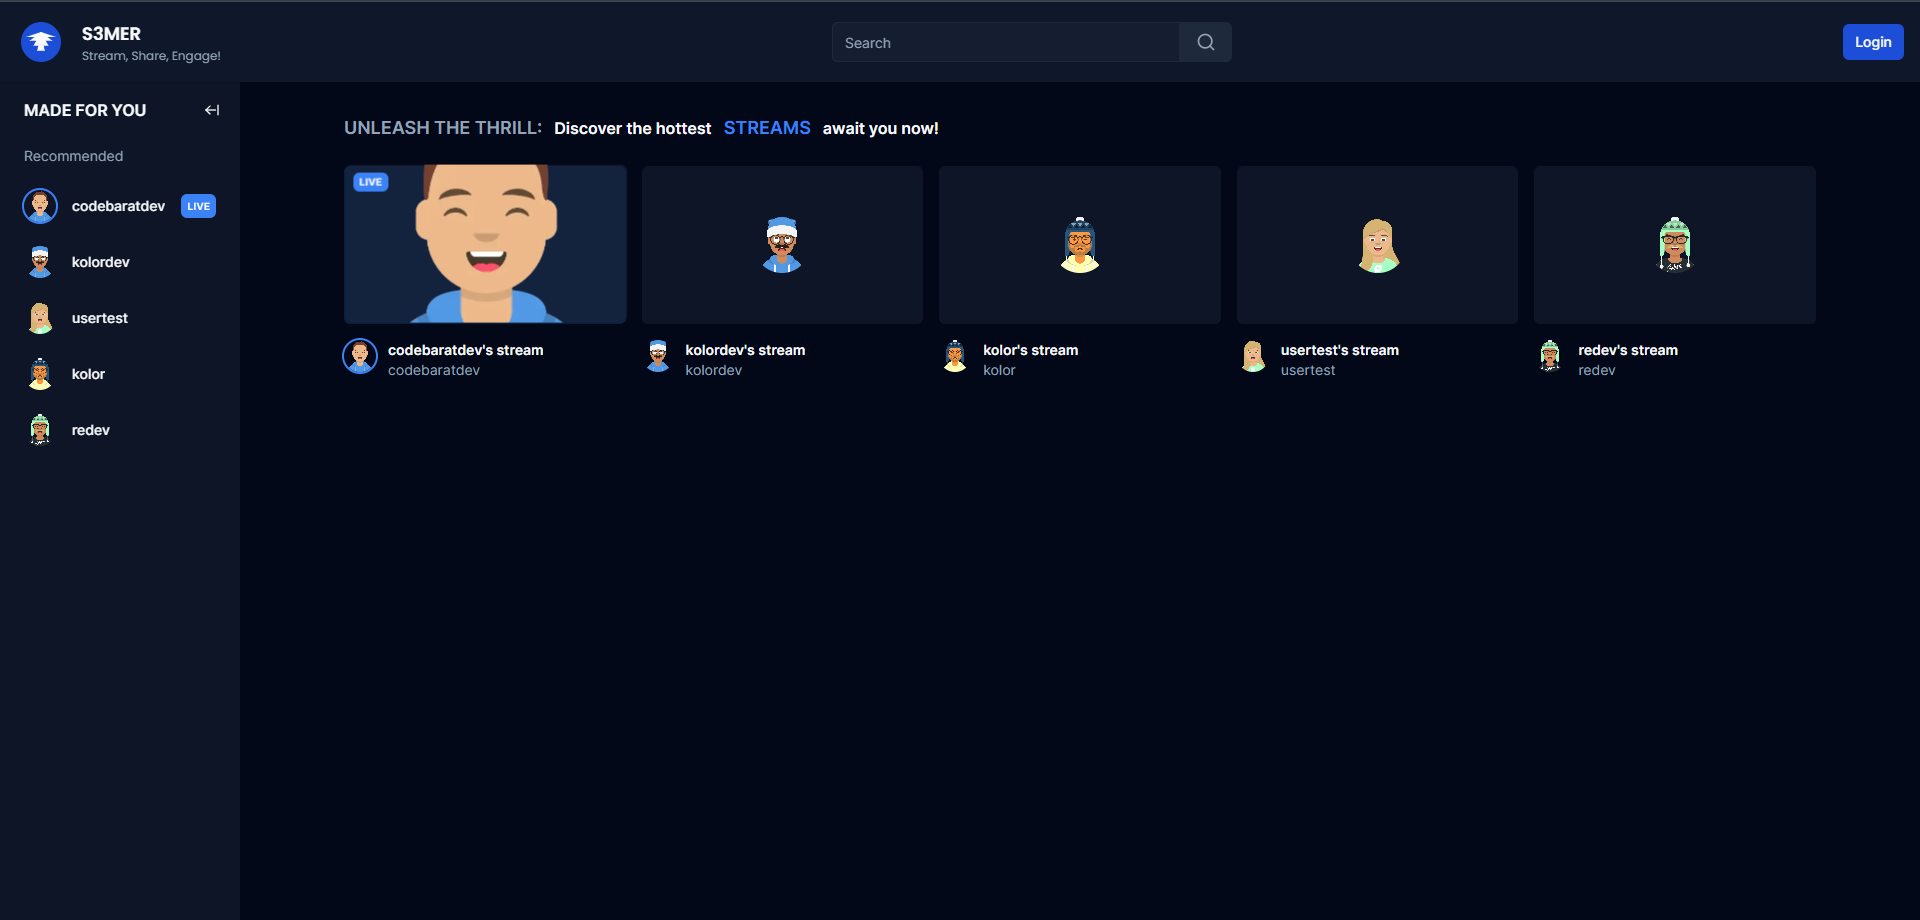
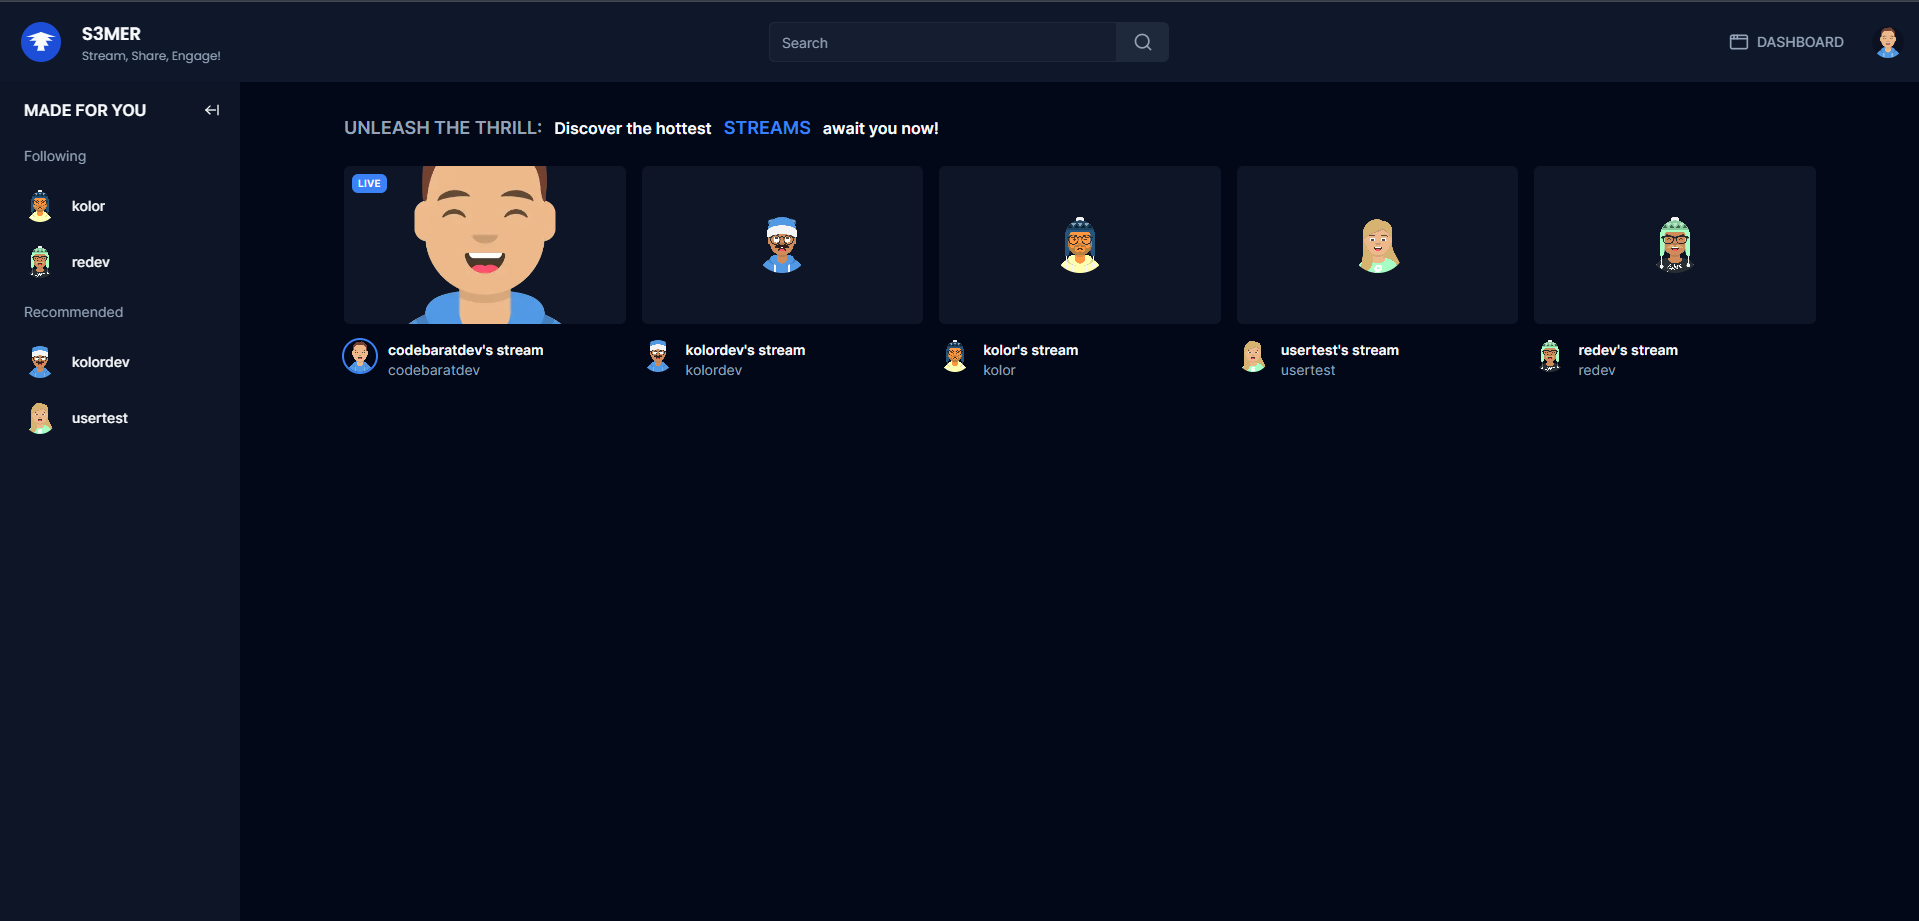
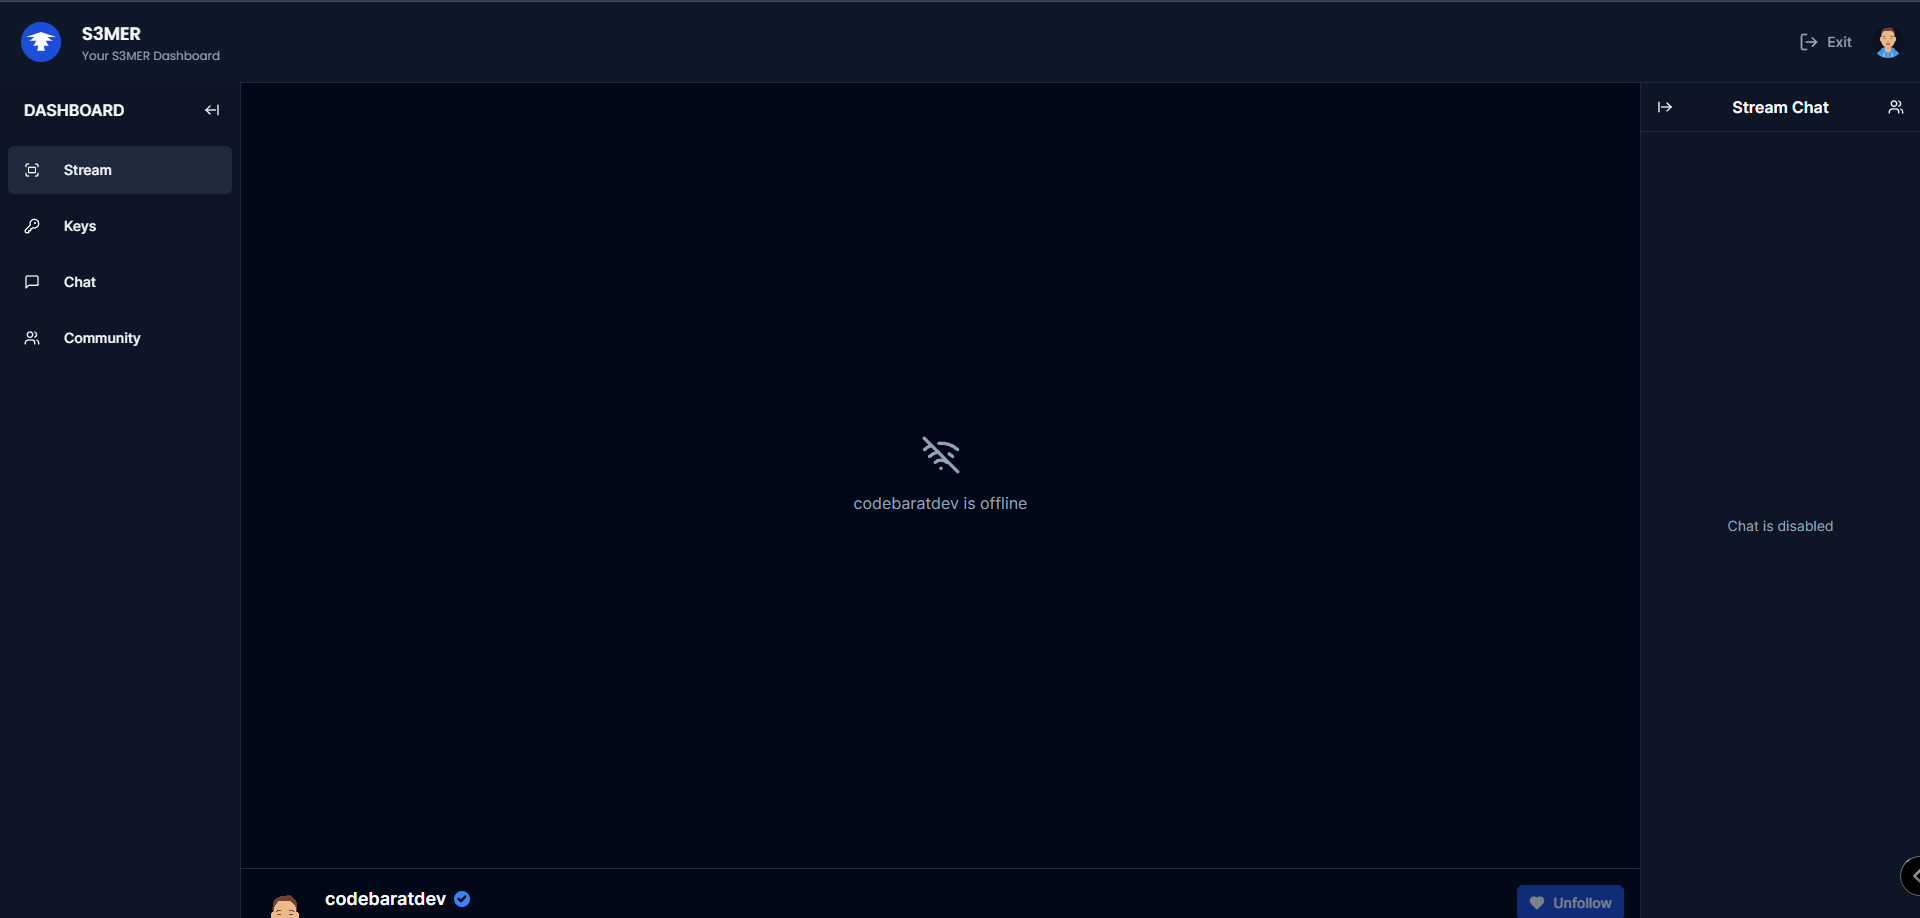
S3MER – Advanced Customizable Live Streaming Platform
(UPDATE) – with the latest dependencies updates, you will have to do some small config changes.
S3MER is an innovative and customizable live streaming platform designed to revolutionize the streaming experience. It offers a feature-rich environment akin to popular platforms, while integrating cutting-edge technologies for enhanced security, customization, and seamless user interaction.
Project Description:
🌟 S3MER Platform 🎥
This repository hosts a cutting-edge livestream platform built upon a robust tech stack utilizing TypeScript, React, Next.js, and TailwindCSS to provide a dynamic and responsive user interface. Leveraging the power of Shadcn-ui and Clerk, LiveStreamX delivers a visually immersive experience with personalized themes and advanced user authentication capabilities.
Prisma & MySQL: Ensuring efficient data management and storage.
Socket.io & WebRTC: Enabling real-time communication and streaming capabilities.
WebSockets, Clerk & JWT-decode: Strengthening secure data transmission and authentication.
Livekit: Leveraging Livekit components, client, and server SDKs for enriched streaming functionalities.
Tanstack/react-table & Zustand: Facilitating seamless data handling and state management.
Uploadthing & Sonner: Streamlining file uploads and enhancing user interaction.
Svix & Webhooks: Providing a robust integration framework for external services.
NGROK: Enabling secure tunneling for local development and testing.
RTMP and WHIP connections: Supporting diverse streaming protocols for broad compatibility.
Server actions: Implementing comprehensive server-side functionalities for streamlined operations.
Features & Capabilities:
Real-Time Streaming: Utilizing WebRTC and WebSockets for seamless live streaming capabilities.
Security: Prioritizing robust security measures for user data and interactions. Integrated authentication, JWT, and additional security layers for user protection.
Efficient Data Management: Leveraging Prisma, MySQL, and other technologies for efficient data management.
Cutting-edge Technologies: Leveraging the latest in streaming technology to provide a seamless experience.
Customizable UI/UX: Developed with TailwindCSS and Shadcn-ui, ensuring an engaging user interface. Empowering users with extensive customization options for their streaming environments.
Scalable Architecture & Performance: Built with scalability in mind to accommodate growing user bases while maintaining optimal performance with a focus on delivering a smooth streaming experience.
Get Involved & Contribute
This project is continuously evolving, incorporating new technologies and enhancements to deliver an exceptional live streaming experience. Contributions and feedback from the community are highly encouraged and welcomed!
Contributions to S#MER are welcome! Whether you’re passionate about enhancing user experience, optimizing performance, or adding new features, your contributions are valued.
# install prisma
npm i @prisma/client
# init
npx prisma init
# create a new migration
npx prisma migrate
# create a new database
npx prisma db push

npx prisma studio
The OData V4 TYPEORM Connector provides functionality to convert the various types of OData segments
into SQL query statements, that you can execute over a TYPEORM.
Potential usage scenarios
Create high speed, standard compliant data sharing APIs
Usage as server – TypeScript
example request: GET /api/users?$filter=id eq 42&$select=id,name
importexpressfrom'express';import{odataQuery}from'odata-v4-typeorm';import{getRepository}from'typeorm';import{User}from'../entities/user';constapp=express();constusersRepository=getRepository(User);app.get('/api/users',odataQuery(usersRepository));constport=3001;app.listen(port,()=>console.log(`Example app listening on port ${port}!`));
executeQuery by repository
importexpressfrom'express';import{executeQuery}from'odata-v4-typeorm';import{getRepository}from'typeorm';import{User}from'../entities/user';constapp=express();app.get('/api/users',async(req,res)=>{try{constusersRepository=getRepository(User);constdata=awaitexecuteQuery(usersRepository,req.query);returnres.status(200).json(data);}catch(e){returnres.status(500).json({message: 'Internal server error.'});}});constport=3001;app.listen(port,()=>console.log(`Example app listening on port ${port}!`));
executeQuery by queryBuilder
importexpressfrom'express';import{executeQuery}from'odata-v4-typeorm';import{getRepository}from'typeorm';import{User}from'../entities/user';constapp=express();app.get('/api/users',async(req,res)=>{try{constqueryBuilder=getRepository(User).createQueryBuilder("user").where("user.roleName = :roleName",{roleName: 'admin'});constdata=awaitexecuteQuery(queryBuilder,req.query);returnres.status(200).json(data);}catch(e){returnres.status(500).json({message: 'Internal server error.'});}});constport=3001;app.listen(port,()=>console.log(`Example app listening on port ${port}!`));
createFilter
import{createFilter}from'odata-v4-typeorm'//example request: GET /api/Users?$filter=Id eq 42app.get("/api/Users",(req: Request,res: Response)=>{constfilter=createFilter(req.query.$filter);// connection instance from pg moduleconnection.query(`SELECT * FROM Users WHERE ${filter.where}`,filter.parameters,function(err,result){res.json({'@odata.context': req.protocol+'://'+req.get('host')+'/api/$metadata#Users',value: result.rows});});});
Newest code has preliminary support for PlayStation controllers — only one type of controller can be used at a time, and each one requires their own build.
In other words, the code can support either PSX controllers or SNES controllers, but not both.
NOTE:
I didn’t realize the original was on Github when I started this, which is why this isn’t a fork… original code is up at https://github.com/raphnet/4nes4snes
Pinout / “Schematic” (SNES version)
               Pin 1
(Latch)    P3.2 - o     - 3.3V (connect to GND via 0.1uF)
(Data #1)  P1.4 -       - 5.0V (connect to USB VBUS, connect to GND via 0.1uF)
(Data #2)  P1.5 -       - GND  (to USB GND)
(Data #3)  P1.6 -       - USB D-
(Data #4)  P1.7 -       - USB D+
          Reset -       - P3.4
(Multitap) P3.1 -       - P3.3 (Clock)
(LED)      P3.0 -       - P1.1
It should be noted that this is pretty much the entire schematic. You only need to connect two 0.1uF decoupling capacitors (one between 5.0V and GND, and one between 3.3V and GND),
If you want to see the blinky LED (which is only really needed for debugging to ensure that the chip is programmed and running), you’ll need an LED and resistor (1K resistor is probably suitable).
Logic is +5V like the original design.
To reprogram the chip at some point (for example, if the flashing doesn’t go right and you need to retry with a different tool…), connect 3.3V to USB D+ (pins 16 and 12) via 10~20K resistor when connecting the USB to your host machine.
I’ll just note here that if you end up with a CH551 with bootloader 2.3.1 (the latest as of this writing), you may want to grab one of the tools in my repos, or the original programming tool from WCH’s website, because most of the tools out there do not work with CH551, only CH552. (This code should also work just fine with CH552, though CH551 is about 30% cheaper and will work equally well, as even the CH551 is only about half full in terms of flash and RAM.)
Pinout / “Schematic” (PSX version)
               Pin 1
(Command) P3.2 - o     - 3.3V (connect to GND via 0.1uF)
(ATT #1)  P1.4 -       - 5.0V (connect to USB VBUS, connect to GND via 0.1uF)
(ATT #2)  P1.5 -       - GND  (to USB GND)
(ATT #3)  P1.6 -       - USB D-
(ATT #4)  P1.7 -       - USB D+
         Reset -       - P3.4
(Data)    P3.1 -       - P3.3 (Clock)
(LED)     P3.0 -       - P1.1 (ACK)
For this version, this assumes that whatever PlayStation controllers are being used are okay with +5V logic throughout. I believe it may be safer to add a +3.3V regulator and tie both pins 15 and 16 to it (with appropriate decoupling).
Why?
Many reasons:
CH551 is insanely cheap. The chip is less than USD$0.25 in small quantities.
Way fewer parts! Only 2 decoupling caps and a USB connector, makes it way easier to build!
It supports hardware 12Mbps USB (no V-USB hackery at 1.5Mbps). This means faster response times, as the poll interval can be set as low as 1ms!
It has hardware support for 4 interrupt IN endpoints, and can be configured to look like 4 different controllers to all sorts of devices.
This allows Linux to see 4NES4SNES as 4 controllers without a kernel patch! (Tested in Linux Mint 19 with a different USB VID/PID. Latest code still works with Windows as well without issue.)
This is an example of how to support multiple gamepads (and can easily be dumbed down to support 1 or 2 gamepads). I’ve parameterized this code to make it more obvious how things need to change to adjust for fewer controllers. (4 is the maximum.)
How?
I started with the following:
CH552/551 datasheet in Chinese, which I liberally Google Translated
And of course, Raphnet’s 4NES4SNES v1.5 code (available at https://www.raphnet.net/electronique/4nes4snes/index_en.php)
The main code is based largely on the USB HID example, with a number of tweaks made (actually, a LOT of tweaks made), as the example only had two of the four non-control endpoints used. Figuring out the quirks to make endpoint #4 work as the others was important, as it doesn’t have its own DMA address directly (it’s always endpoint #0 + 0x40), and it doesn’t support the auto-DATA0/DATA1 toggle that the other endpoints do.
I decided early on that this was an all-or-nothing thing. I wanted 4 controllers, and I wanted them to work in Linux without a kernel patch. I figured that if push came to shove, I’d program this thing to act as a USB Hub and emulate accesses to 4 virtual downstream devices, but thankfully, that doesn’t seem to be necessary.
This code uses the VID/PID I obtained from OpenMoko a number of years ago for my 5NES5SNES variant in 4 controller/12 button mode. Because of this, I also enabled my 12 button mode here.
Wait, 12 buttons? But an SNES controller only has 8…
You’re right! But I originally built my 4NES4SNES variant to support 12 buttons because I made my own “SNES” controllers (two 4021 shift registers cascaded), which allows me to access the additional 4 buttons. You can use actual SNES controllers with this version as well, but buttons 9-12 will never fire. (It’s sort of the same as using NES controllers with it — you’ll only ever see 4 of the buttons fire, even though more than 4 show up to the OS.)
Current Status (NES/SNES)
It works! SNES controller support tested on actual hardware as of 2020/02/09.
NOTE: If downloaded prior to 2020/02/16, there was an issue with Windows PCs detecting it properly. New version fixes this.
NOTE #2 (Updated 2021/04/11): Apparently this doesn’t work reliably with multiple NES/SNES pads. It works perfectly with a single enabled, but with varying success for multiple controllers. The current code works OK in Linux (tested in Retropie and Linux Mint 20), but not as well in Windows 10.
Current Status (PlayStation)
DualShock and DualShock 2 work, with some caveats:
L2/R2 analog function doesn’t yet work
Analog mode won’t turn off, even if you press the button (code always expects analog mode anyway, so this doesn’t hurt anything).
Original digital pad is still untested.
Same note from 2021/04/11 applies as the NES/SNES one — doesn’t really work with multiple controllers in all cases, even if it reports them.
CodeParadise is the name of a framework and a future platform. CodeParadise as framework allows developing web applications, Node.js applications and mobile apps in Smalltalk only. CodeParadise is based on the Pharo Smalltalk environment.
The general principle behind CodeParadise is the execution of a regular (but tiny) Smalltalk image inside a JavaScript execution environment. During development this tiny Smalltalk image communicates with a full Pharo development environment to be kept up to date and provide the typical live programming experience we love so much in Smalltalk. Since CodeParadise runs in a Smalltalk image, there is no need for transpiling Smalltalk to JavaScript. That is: Smalltalk all the way!
JavaScript libraries can be used from your Smalltalk code quite easily. The DOM model is coded in CodeParadise, but many other things can be accessed through a generic proxy mechanism. Furthermore, support has been added for two UI frameworks:
Shoelace (many, but not all components yet) website
If you plan on developing Node.js applications, please clone the CP-Node repo into a separate directory. It only contains 2 ‘required’ files: cp-node.js and client-environment.image. You can also copy them to a preferred directory (instead of cloning the repo).
Start CodeParadise
Thanks to Tim there is a menu ‘Paradise’ in Pharo’s menubar which allows starting the environment. First select ‘Reset’ from the ‘Paradise’ menu and then open one of the existing web applications through ‘Open’. Some more explanation follows below for manually starting and stopping servers and applications.
Start your browsers
If all went well you should be able to fire up a number of browser tabs/pages and start using the example applications. Profit warning: the examples are still very limited, but should allow some insight in what is possible and allow you to play with it yourself.
The example applications can be reached using the following URLs:
(replace the value of the APP environment variable with the identifier of your preferred application)
Using Ionic Framework NEW
The Ionic Framework support is a recently added feature. It allows you to build mobile apps more easily.
If you are using Ionic components inside your shadow DOM (the recommended way when creating WebComponents with CodeParadise), please make sure to include the CSS bundle in all your #style methods. Ionic uses some global styling which does not penetrate through the shadow DOM’s encapsulation. Please add the following CSS rule to your style method (or use a more specific version if required):
The CSS included is not very big in size and browsers should cache the content, so it does not have to load on every WebComponent you have developed.
Using developer tools
CodeParadise currently has a ‘debugger’ and a View inspector. The debugger is mostly an inspector too, you can’t change code but you can see the stack trace and inspect variables. Already very useful during development.
The View inspector allows you to open a special pane in which you can view the DOM, including the Shadow DOM of your WebComponents. The WebComponents created in Smalltalk can be edited right in your browser! Change the HTML template or CSS style of your WebComponent in two coding panes. Update the browser by simplying pressing Cmd-S/Ctrl-S or clicking a button. Press Shift-Cmd-S/Shift-Ctrl-S to actually save it in your Smalltalk image once your satisfied with the results. To start the View inspector press Cmd-i/Ctrl-i or press Cmd-b/Ctrl-b to select a WebComponent by name (instead of browsing through the DOM).
You can install the debugger or View inspector sending either addDebugger or addViewInspector to your Application (in the load method of the Application for example).
To start CodeParadise the following code has to be executed:
CpDevTools start.
This will start a HTTP and WebSocket server. Once the environment is started you can run as many applications as you want. You can then start an application using the following:
CpPresentationWebApplication openInBrowser.
When you are done or want to reset the environment, the following code can be executed:
CpDevTools stop.
"Garbage collect works better in triples ;-)"3timesRepeat: [ Smalltalk garbageCollect ].
Tips and troubleshooting
Tip: The server image keeps all sessions in memory at the moment (they never expire yet). So once in a while use the reset code above to clean up the sessions. Remember the sessions will also be saved in the image. So closing and reopening your image should bring you back the session and you can continu where you left off.
Resource not found
If you encounter any problems with connecting to the server, please check that no other web server is running on the port you are using/trying to use. If you have started a web server pointing to the wrong client environment, please first stop that instance. Otherwise you will keep on serving files from an empty or non-existing directory. Use the reset as described above to stop the server. You might want to check if all ZnServer instances are really stopped. Then create a new instance of the server.
Unknown classes
Once you have a client running and change code, the client environment might not know a class you are using. Please add this class by using the #beLoaded method (see existing senders to understand its usage). You might need to manually install it in a running environment (you have to find the corresponding server environment and use #addClass: to add it). Or reload the page in your browser. In some cases this is not enough, because of the order in which classes are installed. In such case you have to close the tab/page and open a new browser tab/page.
Possible usages
The remote code execution capabilities of CodeParadise can be used to create WebApplications, Node.js applications, remote worker instances, mobile applications, etc.
To create WebApplications an MVP (Model View Presenter) pattern is implemented for ease of development. It is based on WebComponents and more specifically it uses the HTML templates technology. The idea is to create a full set of components/widgets to create full featured web applications. All under the control of a Smalltalk application.
Applications can also be ‘sealed’ allowing them to be run without the need of a Pharo server image. This allows you to create mobile apps, or stand alone Node.js server applications or Node.js CLI tools. This feature is incompatible with the MVP-based applications, since they require communicating with Models and Presenters which run on the Pharo server image.
Compatibility
The means of installing (Compiled) code in the tiny Smalltalk image (aka ClientEnvironment) is by sending the relevant bytecode. The current implementation assumes that both the Pharo server image (aka ServerEnvironment) and the ClientEnvironment share the same bytecode set. Since the ClientEnvironment is running on SqueakJS VM, only bytecode sets supported by SqueakJS VM are usable. Currently Pharo 10 up to 13 (and including) are supported. Active development is on P12. Support for P8 and P9 is no longer provided, because of the non-standard process of creating the tiny Smalltalk image which runs in the browser. From P10 onwards this is standardized using TinyBootstrap. IF you still need support for P8 or P9, please contact me directly or create an issue.
There is no explicit list of supported browsers at the moment. Please use a recent browser version. If you have trouble using (the pre-Chrome based) Microsoft Edge, please consider switching to Chrome, Firefox or one of the derivatives.
This script will create a folder named component-library where the template is ready to be used to host your CSS components. This also removes the .git folder to ensure it is correctly tracked into your project.
Then install it’s node packages:
npm install
Development
To test locally the component library usually at this address:
npm run dev
This script will run watchers and browser sync to ensure everything you update will be detected, so twig templates, sass styles, md posts, js scripts, assets and also metalsmith.js and metalsmith.yml files.
If you are working with a virtual machine and you don’t need browser sync, you can run watchers only with this:
npm run watch
To build your library without run any watchers / HTTP servers:
npm run build
The library will be built inside build folder with relative paths, this means it should run without the HTTP server.
Configuration
This is the configuration of CrysaliCSS component library ONLY.
To let your CSS source run inside the component library, you’ll need to customize the source-styles npm script stored here.
File
Description
metalsmith.yml
This is the main Metalsmith configuration used inside metalsmith.js, there is background and viewports configuration, then all the stuff you need to customize. Be sure your CSS source is correctly set here. The icons are based on Material design icons codes.
Some info about the project folders
Folder
Description
assets
Where all images are stored.
js
Where all JavaScript files are stored, like iframe nav or clipboard interaction.
posts
Where all Markdown documentation posts are stored. You will add HTML components and how they work with markdown syntax.
You should put your CSS documentation inside posts folder, in the code below you’ll see how a page should be written.
Front matter structure
Variable
Optional
Description
collection
✗
Used to group components.
date
✓
The date of the documentation page created.
title
✗
The title of the documentation page created.
view
✗
The template page used, it should be used with example.twig template.
snippets
✓
An array of code snippets, used to display all the components of this page.
snippets[0].title
✓
A title of the component.
snippets[0].text
✓
A description of the component (markdown is supported).
snippets[0].cover
✓
Used to choose which snippet is showed on index page.
snippets[0].code
✗
The code snippet of the component, will be copied in the clipboard and rendered on the page if render is not defined.
snippets[0].render
✓
The rendered HTML of the component’s code snippet, this is used just to improve render with additional html which should be not copied as code snippet.
snippets[0].syntax
✓
Defines the language used by code to be properly colored. The file metalsmith.yml contains the defined available languages for prismjs which is used to color your code. Find prism.languages and check if your languages are included. You can checkout the available list of languages used in the prismjs website.
A template page as example:
---
collection: buttonsdate: 2018-09-13T10:29title: Buttonview: example.twigsnippets:
-
title: 'The main buttons'text: 'A basic button, used all around the app.'code: | <a href="#" class="button"> A simple button </a>
-
title: 'The main buttons'text: 'You can define color syntax like in this example.'cover: truecode: | <a href="#" className="button"> A simple button </a>syntax: hamlrender: |<a href="#" class="button">A simple button</a>
-
text: 'Button used to cancel actions. You can use `render` field to display a different content to make better explanations on how components are displayed.'code: | <a href="#" class="button button--cancel"> Cancel </a>render: | <div style="display: flex;"> <a href="#" class="button button--cancel"> Cancel </a> <a href="#" class="button"> Do it! </a> </div>
---
This is the optional markdown block with additional documentation.
Java code to parse an input CharSequence, controlled by a format string from a java.util.Formatter.
Similar in concept to a “scanf”, but the format String syntax is different. This code is mainly intended to be used with fixed records.
Usage
Say you created a String with the following code
String format = "This is my data: %5d%7x%7o%4s%4.2f values in %%";
String result = String.format(format, 1234, 0x1234, 01234, "1234", 1234.56);

result = "This is my data:  1234   1234   123412341234.56 values in %"
To read back the information:
Unformatter unf = new Unformatter(format);
List<Object> scanned = unf.unformat(result);
scanned will contain the following:
Long 1234
Long 4660 (same as hex 0x1234)
Long 668 (same as octal 01234)
String “1234”
Double 1234.56
CharSequence “”
All parsed values are returned as Longs, Doubles, or Strings as appropriate.
The last element (5 in the above example) represents any remaining data in the input that was not parsed. This is useful if you are reading from a CharSequence containing multiple records.
Supported Format Conversions
Note: Since this if for reading fixed formats, all conversions should include a width!
d decimal, returned as a Long
f floating point, returned as a Double
h hex, returned as a Long
o octal, returned as a Long
s string, returned as a String
% not really a conversion, but “%%” in the format is converted to fixed text “%”
n not really a conversion, but “%n” in the format is converted to a fixed text newline
Unsupported Stuff
any conversions not noted above, including uppercase
argument indexing
flags (sorry, no locale-specific grouping for now)


