BRAINscape: A Comprehensive Multi-Omics Analysis Tool
Overview
BRAINscape is an R package designed for integrative multi-omics analysis, specifically developed for the MU-BRAIN dataset, a multiethnic RNAseq dataset. The package facilitates stratified eQTL mapping and Differential Expression Analysis, providing a user-friendly framework for researchers to explore genetic and transcriptomic associations.
Features
eQTL Analysis: Supports cis and trans eQTL mapping.
Differential Expression Analysis: Uses DESeq2 for robust transcriptomic profiling.
Interactive Data Exploration: Shiny-based web interface for data visualization.
Supports Ethnicity-Specific Analysis: Users can filter results by Hispanic and Non-Hispanic Whites (NHW) groups.
Advanced Visualization:
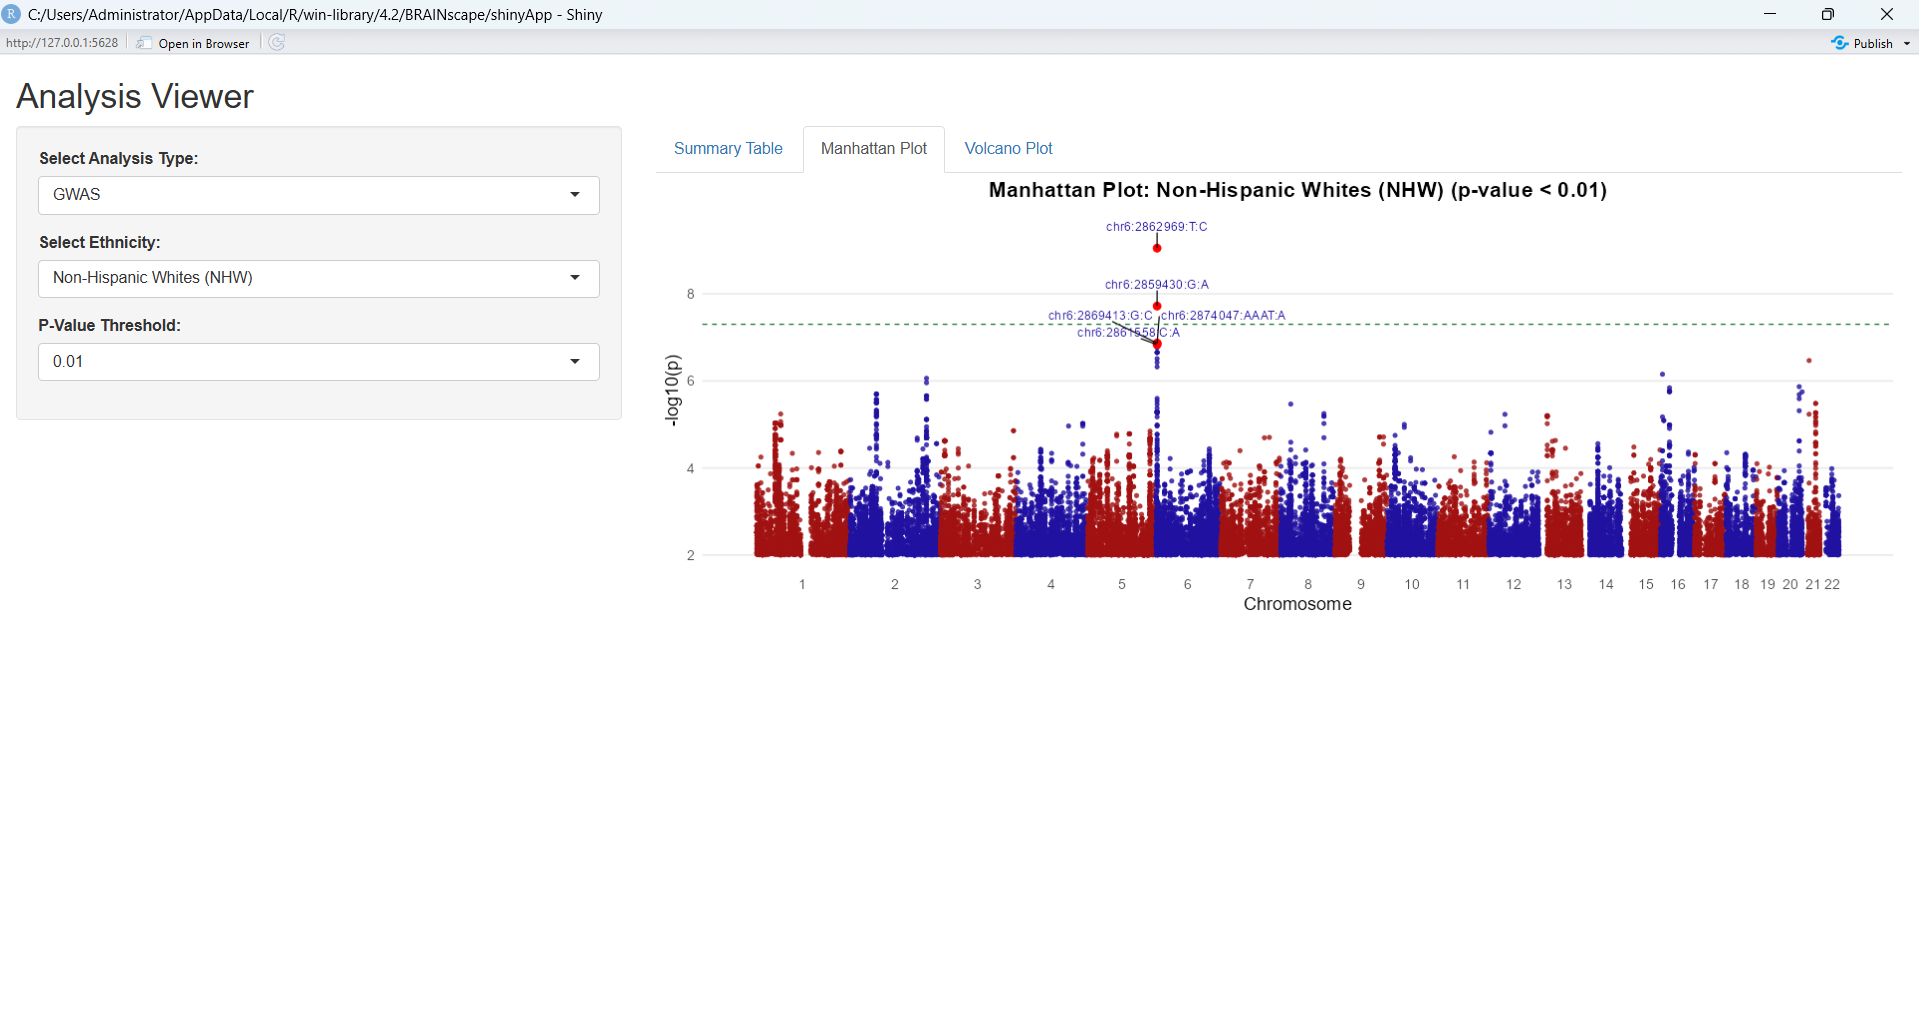
Manhattan Plots for eQTL results.
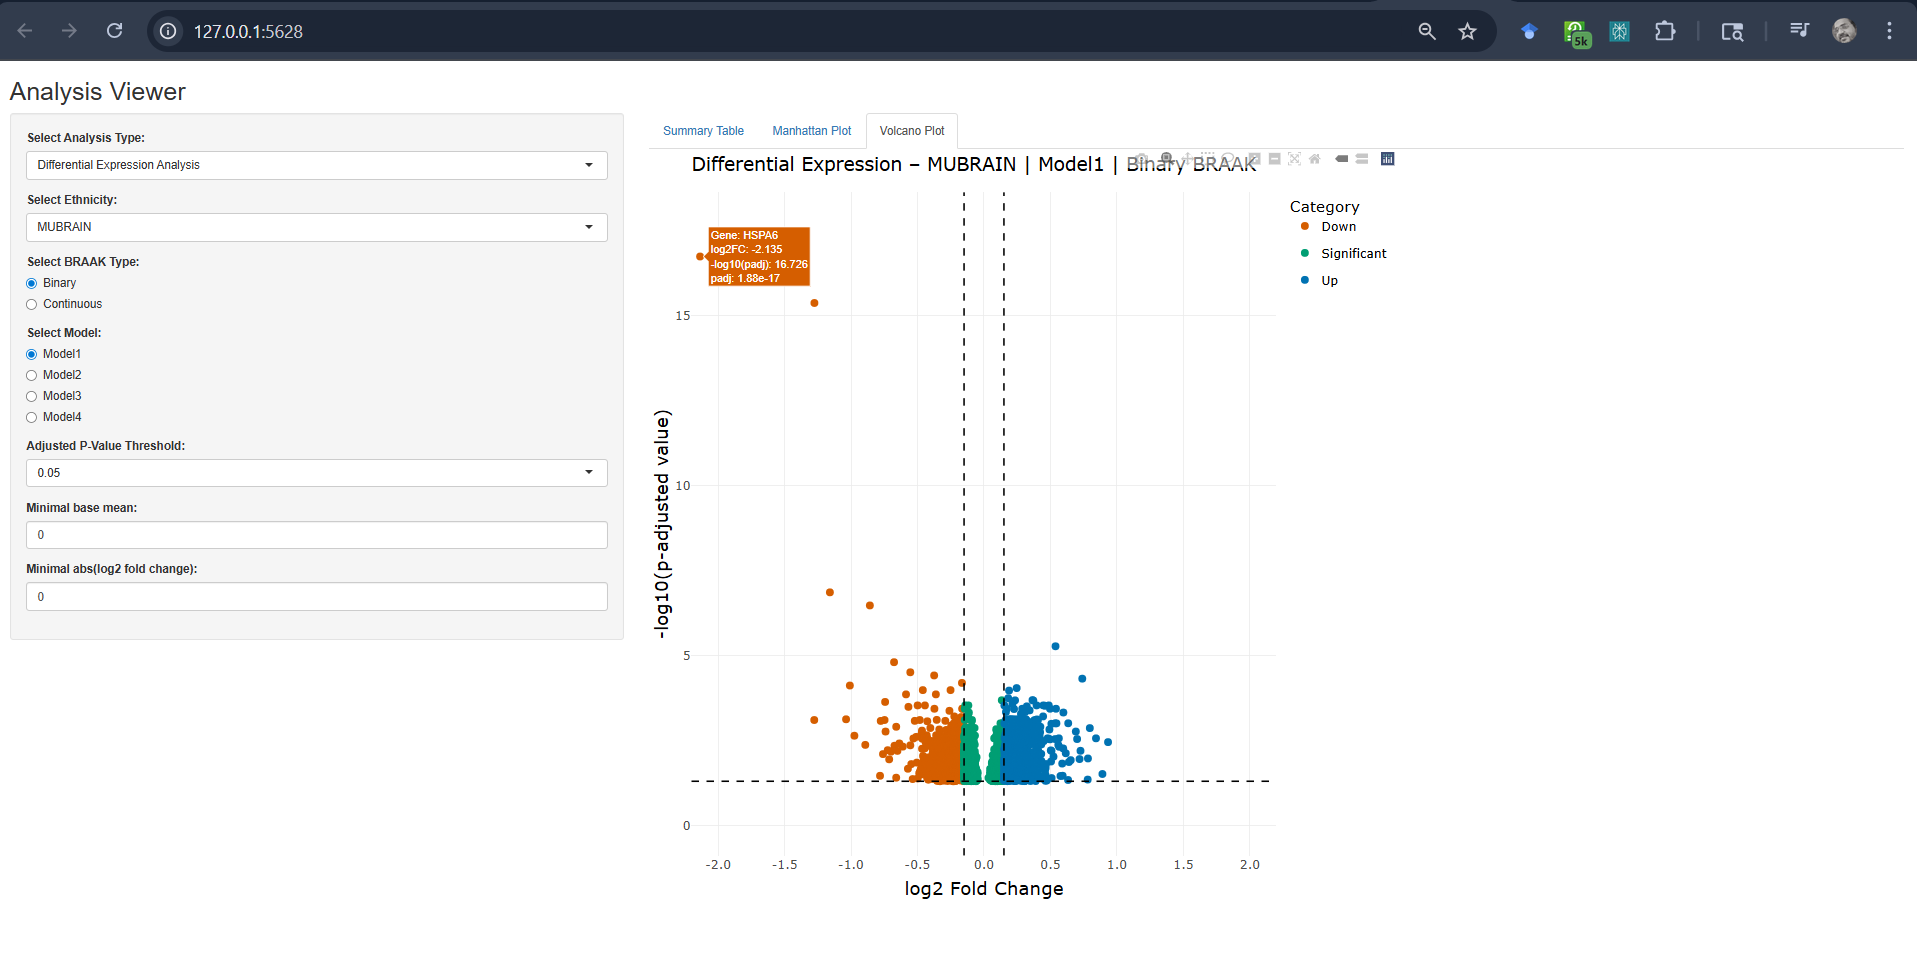
Volcano Plots for Differential Expression Analysis.
Installation
Install the dependencies: shiny, ggplot2, CMplot, dplyr using install.packages(c("shiny", "ggplot2", "CMplot", "dplyr", "DT", "plotly", "ggrepel"))
To install BRAINscape, first download the source file from zenodo and then install it using the following command:
SelectEthinicity:HispanicsorNon-Hispanic Whites (NHW)
SelectAnalysisType:eQTLSelecteQTLType:cisortransAdjustNominalP-valueThreshold# Example: Parameter selection and visualization for eQTL analysisanalysis_type<-"eQTL"ethnicities<-"Non-Hispanic Whites (NHW)"eqtl_type<-"trans"gene<-"COLGALT2"p_threshold<-0.05# Results will display Manhattan plots and interactive tables
Note: Due to large data size, the trans-eQTL data will take some time (around 10-15 secs) to load and reflect in the Shiny GUI.
2. Load and Explore Differential Expression Analysis Results
SelectEthinicity:HispanicsorNon-Hispanic Whites (NHW) orMU-BRAINSelectAnalysisType:DifferentialGeneExpressionAdjustCutoffforp-value (adjusted), BaseMean, andLog2FoldChange# Example: Parameter selection and visualization for eQTL analysisanalysis_type<-"Differential Expression Analysis"ethnicities<-"MUBRAIN"adjusted_p_threshold<-0.05# Results will display volcano plot and interactive tables
3. Load and Explore GWAS Analysis Results
SelectEthinicity:HispanicsorNon-Hispanic Whites (NHW)
SelectAnalysisType:GWASAdjustNominalP-valueThreshold# Example: Parameter selection and visualization for eQTL analysisanalysis_type<-"GWAS"ethnicities<-"Non-Hispanic Whites (NHW)"p_threshold<-0.05# Results will display volcano plot and interactive tables
Data Sources
The BRAINscape package does not include raw data due to data sharing constraints.
Citation
If you use BRAINscape for your research, please cite:
Yang, Z., Cieza, B., Reyes-Dumeyer, D., Lee, A., Ma, Y., Yilmaz, E., Lantigua, R., Miller, G.W., Brown, L.M., Honig, L. and Ciener, B., 2024. MU-BRAIN: MUltiethnic Brain Rna-seq for Alzheimer INitiative. bioRxiv, pp.2024-02.
Ruhela, V., Basilio Cieza Huaman, Zikun Yang, & Giuseppe Tosto. (2025). BRAINscape (1.0.0). Genetics and Genomics (Zenodo). https://doi.org/10.5281/zenodo.17831756
Contributing
We welcome contributions! To contribute:
Fork the repository.
Make improvements.
Submit a pull request.
Support
For issues and feature requests, please open a ticket on GitHub Issues.
License
This package is licensed under the Apache License. See LICENSE for details.
mk – entry point-ul programului și loop-ul de citire a comenzilor
mk_functions – interogări în dicționar (autocorrect, autocomplete)
trie – implementarea structurii unui trie
trie_node – implementarea structurii interne dintr-un trie
utils – funcții ajutătoare
Structuri de date folosite
trie – pentru a stoca cuvintele din dicționar și a facilita interogările
Comenzi
INSERT <word> – Se inserează un cuvânt în dicționar.
LOAD <file> – Se încarcă cuvintele din fișierul dat ca argument.
REMOVE <word> – Se șterge un cuvânt din dicționar.
AUTOCORRECT <word> <max_letters> – Se caută în dicționar cuvintele de
aceeași lungime cu word, care diferă prin cel mult max_letters litere și se
afișează în ordine lexicografică. Se afișează “No words found!” dacă nu există
niciun cuvânt care să îndeplinească condiția.
AUTOCOMPLETE <prefix> <mode> – Se completează prefixul cu cuvinte din
dicționar, în funcție de mode. Se afișează “No words found!” dacă nu există
niciun cuvânt care să înceapă cu prefix.
EXIT – Se golește dicționarul și se termină execuția programului.
Funcționalitate
INSERT: Se inserează un cuvânt în dicționar, parcurgându-se literă cu
literă, creându-se nodurile aferente dacă nu există, iar la nodul final se
incrementează numărul de apariții ale cuvântului (inițial 0). La întoarcerea din
inserție, se calculează pentru fiecare nod parcurs frecvența maximă și lungimea
minimă a cuvintelor care se ramifică din acel nod, pentru a facilita
interogările ulterioare.
LOAD: Se inserează toate cuvintele dintr-un fișier dat (vezi INSERT).
REMOVE: Se șterge un cuvânt din dicționar, parcurgându-se literă cu literă
și setându-se numărul de apariții ale cuvântului 0. La întoarcere, se
recalculează frecvența maximă și lungimea minimă a cuvintelor care se ramifică
din noduri și se șterg nodurile care nu mai conduc către niciun cuvânt.
AUTOCORRECT: Se parcurge arborele până la nivelul corespunzător lungimii
cuvântului inițial, încercându-se toate combinațiile de litere care conduc la
cuvinte existente, în limita schimbărilor de litere disponibile. Se contorizează
numărul de litere schimbate. Când se ajunge la nivelul corespunzător, dacă
cuvântul curent este valid, se afișează. Modul de încercare a combinațiilor
garantează că rezultatele vor fi în ordine lexicografică. În cazul în care
niciun cuvânt nu este găsit, se afișează “No words found!”.
AUTOCOMPLETE:
Se parcurge arborele până la nodul corespunzător prefixului dat. Există 4
moduri de autocomplete, dintre care 0 semnifică că se vor executa toate
celelalte 3:
1: Se afișează primul cuvânt (în ordine lexicografică). Pentru aceasta, se
pleacă din prefix, se încearcă fiecare literă din alfabet și se avansează pe
prima găsită (modul de construire a trie-ului garantează că toate literele
disponibile duc la cuvinte existente). Se afișează primul cuvânt descoperit.
2: Se afișează cel mai scurt cuvânt. Pentru aceasta, se pleacă din prefix,
și se urmăresc nodurile care duc la o lungime minimă cu 1 mai mică decât cele
curente. Se afișează primul cuvânt descoperit.
3: Se afișează cel mai frecvent cuvânt. Pentru aceasta, se pleacă din
prefix, se încearcă fiecare literă din alfabet și se urmăresc nodurile care
duc la cuvinte cu aceeași frecvență maximă ca și cele curente. Se afișează
primul cuvânt descoperit.
Pentru toate cele 3 moduri, dacă nu există niciun cuvânt care să
îndeplinească condiția, se afișează “No words found!”.
Grație similarității modurilor de autocomplete, am implementat o singură
funcție care primește în plus ca parametri 2 funcții:
O funcție de stop, care spune când se oprește căutarea;
O funcție de avansare, care spune cum se alege nodul următor în parcurgere.
EXIT: Se eliberează elementele stocate în trie și se termină execuția
programului.
KNN
Structura proiectului
kNN – entry point-ul programului și loop-ul de citire a comenzilor
kNN_functions – interogări asupra datelor (range search și nearest
neighbour)
array – implementarea structurii unui array list
bst – implementarea structurii unui arbore binar de căutare k-ar
point – implementarea structurii unui punct în spațiul k-dimensional
utils – funcții ajutătoare
Structuri de date folosite
array list – pentru a stoca punctele găsite într-un query
bst k-ar – pentru a stoca punctele din spațiul k-dimensional
Comenzi
LOAD <file> – încarcă datele din fișierul dat ca argument
NN <x1> <x2> ... <xk> – găsește cei mai apropiați vecini ai unui punct dat
ca argument
RS <x1_start> <x1_end> <x2_start> <x2_end> ... <xk_start> <xk_end) – găsește
toate punctele dintr-un anumit interval dat ca argument
LOAD: Programul încarcă dintr-un fișier (primit ca argument al
comenzii LOAD) punctele din spațiul k-dimensional și le stochează într-un
arbore binar de căutare k-ar, cu proprietatea că ordinea stabilită între
nodurile de pe nivelul i este dată de coordonata i % k a punctelor.
NN:
Pentru a determina cei mai apropiați vecini ai unui punct dat ca argument,
se parcurge recursiv arborele, căutându-se frunza cea mai apropiată de punctul
dat, folosindu-se ordinea stabilită de proprietatea arborelui.
La întoarcerea din recursivitate, se calculează distanța euclidiană între
punctul curent și cel țintă, stabilindu-se dacă trebuie inserat în array-ul
rezultat.
Dacă distanța minimă până în acest moment este mai mare decât distanța de la
punctul curent la planul de separație determinat de coordonata i % k a
părintelui, există posibilitatea să se afle un punct mai apropiat în
subarborele frate, așa că se caută și în acela, inserându-se în array-ul
rezultat dacă este cazul.
RS:
Pentru a determina punctele dintr-un anumit interval dat ca argument, se
parcurge recursiv arborele, căutându-se nodurile care se află în intervalul
dat. Pentru eficientizarea căutării, căutarea nu se mai face pe subarborii ai
căror dimensiune de separație (i % k) nu se află în interval, deoarece
niciun punct din acei subarbori nu poate fi în interval.
EXIT: Se eliberează elementele stocate în arbore și se termină execuția
programului.
Most of the specifics of the pipeline can be handled in the config.yaml file. The snakefile, rules and cluster.json SHOULD NOT BE EDITED BY HAND. If you absolutley need to edit cluster.json, I recommend https://jsoneditoronline.org/. Snakemake is very sensitive to syntax, and just saving a file in the wrong format can cause problems.
Download the pipeline from Github or transfer the pipeline from my home directory on 76 server
tar -xvf MiKTMCSnakemakePipeline.tar.gz
mv -v MiKTMCSnakemakePipeline/*.
rm -r MiKTMCSnakemakePipeline/
Run on Greatlakes and Slurm
FYI, the –flags used in the snakemake command call must be somewhere in cluster.json, wwether under the default heading, or the rule heading. If –tasks-per-node is called in the command call, and only –tasks-per-cpu is in your default/rule heading, snakemake will complain that “Wildcards have no attribute…”
The pipeline expects a directory format as the below example
CAUTION Four or more samples must be included, or the PCA scripts will break. It expects pair-end reads. To my knowledge, the pipeline will not accomodate single-end reads.
The pipeline uses two types of annotation and feature calling for redundancy in the event that one pipeline fails/gives ‘wonky’ results
Upon initiating the snakemake file, the snakemake preamble will check fastq file extensions (our lab uses .fq.gz for brevity) and change any fastq.gz to fq.gz. The preamble will then generate a samples.json file using fastq2json.py. You should check samples.json and makesure it is correct because the rest of the pipeline uses this file to create wildcars, which is the driving force behind snakemake.
If no groupfile (groups.txt) was provided, the preample will generate one for you. This file is necessary to run ballgown as well as the PCA plots. This should also be checked for errors. If you provide your own groups.txt, it should be in the format below
The directory and sample names should correspond and be in the order as they appear in the directory. The sample and batch columns can be used to designate phenotype data and any batchs you may have. If you have varying ‘Disease’ types, you can then use this file for differential expression and use the batch column to correct for batch affects. The PCA plotting scripts will plot Disease types in different colors, and different Batchs with different shapes
I have attempted to make this pipeline as streamlined and automatic as possible. It could incorporate differential expression, but I feel that the pipeline completes sufficient tasks for review before Differetial Analysis. In the even that a cohort has Glom and Tub samples, it would be wise to run each separately in their own pipeline. Adding another child directory would be more difficult to code rules for. If there are any plots, qc tools or metrics that you use in your personal analysis, those can be integrated upon request.
Unit 18 PWA Homework: Online/Offline Budget Trackers
Add functionality to our existing Budget Tracker application to allow for offline access and functionality.
The user will be able to add expenses and deposits to their budget with or without a connection. When entering transactions offline, they should populate the total when brought back online.
Offline Functionality:
Enter deposits offline
Enter expenses offline
When brought back online:
Offline entries should be added to tracker.
The application is deployed to Heroku and can be installed as a progressive web app through your browser here:
AS AN avid traveller
I WANT to be able to track my withdrawals and deposits with or without a data/internet connection
SO THAT my account balance is accurate when I am traveling
Business Context
Giving users a fast and easy way to track their money is important, but allowing them to access that information anytime is even more important. Having offline functionality is paramount to our applications success.
Acceptance Criteria
GIVEN a user is on Budget App without an internet connection
WHEN the user inputs a withdrawal or deposit
THEN that will be shown on the page, and added to their transaction history when their connection is back online.
Commit Early and Often
One of the most important skills to master as a web developer is version control. Building the habit of committing via Git is important for two reasons:
Your commit history is a signal to employers that you are actively working on projects and learning new skills
Your commit history allows you to revert your code base in the event that you need to return to a previous state
Follow these guidelines for committing:
Make single purpose commits for related changes to ensure a clean, manageable history. If you are fixing two issues, make two commits
Write descriptive, meaningful commit messages so that you and anyone else looking at your repository can easily understand its history
Don’t commit half done work, for the sake of your collaborators (and your future self!)
Test your application before you commit to ensure functionality at every step in the development process
We would like you to have well over 200 commits by graduation, so commit early and often!
A simulator used to test control algorithms written for an Autonomous Underwater Vehicle
This simulator was developed as a part of my work in Team Tiburon, the autonomous underwater vehicle team of NIT Rourkela. It is developed using Unity3D and written in C#.
The simulator works by communicating with a control algorithm through TCP sockets. The control algorithm may run on a seperate machine.
The simulator receives from the control algorithm, the values of the forces to be applied to the individual thrusters. It send simulated sensor data to the control algorithm as feedback. Amongst the sensors used are cameras. Camera images are sent to the control algorithm every frame. To ensure optimal communication frequency, edge detection is performed on the images before sending.
The code for simulating underwater forces like planing force, slamming force etc., i.e. the contents of ./Underwater Forces, is experimental and not currently in use. This code was taken from the tutorial posted by Erik Nordeus, ‘Make a realistic boat in Unity with C#’, and all rights for that part of the code belong to him.
Once the IP addresses and Port numbers are set correctly, run the simulator. Then, run the control algorithm, set up a client connection to the simulator, and run its server. Finally, press the space bar on the simulator to set up its client connection with the control algorithm.
The control algorithm must send to the simulator forces to be applied at each thruster, as float values. The number, position, and orientation of thrusters on the vehicle can easily be changed.
The simulator provides simulated sensor values as feedback. A total of 8 floating point values are sent, with two digit decimal places, three digits before the decimal, and the sign. This is mentioned for easy decoding of the feedback. The eight values are: the orientation of the vehicle in the x, y, and z axes respectively, the acceleration of the vehicle in the x, y, and z axes respectively, the depth of the vehicle under water, and the forward velocity of the vehicle in its local frame.
To use camera images as feedback, uncomment the like ‘#usePics’ in ControlThrusters.cs. You must decode the image from the values of the edges.
steps:
Add these dependencies if not added
ROS Qt Build – sudo apt-get install ros-kinetic-qt-build
Point Grey Camera Driver – sudo apt-get install ros-kinetic-pointgrey-camera-driver
Install rosbridge-sudo apt-get install ros-kinetic-rosbridge-server
Install AUV Simulator using the installer available in Builds.zip.
start AUV simulator.exe
enter the IP address
run the command roslaunch rosbridge_server rosbridge_websocket.launch
*(pre-requisite rosbridge library should be installed on your linux distribution )
run rosun watchdog watchdog
run simulator_receive_image simulator_receive_image
in AUV simulator.exe : *IN THE MENU YOU CAN TYPE THE IP ADDRESS OR JUST CLICK ON THE LOCAL HOST BUTTON FOR SETTING UP THE WEBSOCKET CONNECTION.
*USE MOUSE AND ARROW KEYS TO MOVE AROUND THE ARENA.
*TO VIEW THE LOG VIEWER/CONSOLE LOGS ,USING MOUSE- CLICK AND DRAG TO MAKE A CIRCULAR GESTURE.
The image provided hereunder deploys a Debian based container with SSH server, pre-compiled software/packages found installed on Raspbian OS (inclusive userland tools) and a default user which is pi.
Base of this image builds debian with enabled SSH, installed userland tools, created user ‘pi’ and preinstalled packages of a Raspbian lite operating system (headless).
Container hosts
The container has been successfully tested on the following hosts
netPI, model RTE 3, product name NIOT-E-NPI3-51-EN-RE
netPI, model CORE 3, product name NIOT-E-NPI3-EN
netFIELD Connect, product name NIOT-E-TPI51-EN-RE/NFLD
Raspberry Pi, model 3B
Raspberry Pi, model 4B (arm32v7,arm64v8)
netPI devices specifically feature a restricted Docker protecting the Docker host system software’s integrity by maximum. The restrictions are
privileged mode is not automatically adding all host devices /dev/ to a container
volume bind mounts to rootfs is not supported
the devices /dev,/dev/mem,/dev/sd*,/dev/dm*,/dev/mapper,/dev/mmcblk* cannot be added to a container
Container setup
Environment variable (optional)
The container binds the SSH server port to 22 by default.
For an alternative port use the variable SSHPORT with the desired port number as value.
Network mode
The container supports the bridged or host network mode. More details at Container networking.
Bridged
Any unused Docker host port needs to be mapped to the default container port 22 or the one set by SSHPORT to expose the container SSH server to the Docker host.
Remark: Container bluetooth functionality is supported in host network mode only.
Host
Port mapping is unnecessary since all the used container ports (like 22 or SSHPORT) are exposed to the host automatically.
Remark: Host network mode is mandatory for using container bluetooth functions.
Hostname (optional)
For an equal default Raspbian OS hostname set the container hostname to raspberrypi.
Privileged mode (optional)
The privileged mode lifts the standard Docker enforced container limitations: applications inside a container are getting (almost) all capabilities as if running on the host directly.
Enabling the privileged mode is optional but mandatory for the following container functions:
bluetooth
userland tools
Host devices (optional)
For bluetooth functionality the /dev/ttyAMA0 Docker host device needs to be added to the container. In conjunction the /dev/vcio Docker host device needs be added to the container as well to allow bluetooth controller resets.
For using userland tools like vcmailbox the /dev/vcio and /dev/vchiq and /dev/vc-mem Docker host devices need to be added to the container.
Container deployment
Pulling the image may take 10 minutes.
netPI example
STEP 1. Open netPI’s web UI in your browser (https).
STEP 2. Click the Docker tile to open the Portainer.io Docker management user interface.
STEP 3. Enter the following parameters under Containers > + Add Container
The container starts the SSH server automatically when deployed.
For an SSH terminal session use an SSH client such as putty with the Docker host IP address (@port number 22 or SSHPORT or bridge mode mapped one).
Use the credentials pi as user and raspberry as password when asked and you are logged in as non-root user pi.
Continue to use Linux commands in the terminal as usual.
Container on Youtube
License
Copyright (c) Hilscher Gesellschaft fuer Systemautomation mbH. All rights reserved.
Licensed under the LISENSE.txt file information stored in the project’s source code repository.
As with all Docker images, these likely also contain other software which may be under other licenses (such as Bash, etc from the base distribution, along with any direct or indirect dependencies of the primary software being contained).
As for any pre-built image usage, it is the image user’s responsibility to ensure that any use of this image complies with any relevant licenses for all software contained within.
Hilscher Gesellschaft fuer Systemautomation mbH www.hilscher.com
This repository is a placeholder, used to gauge the level of interest of Swift for Arduino users in a TabNine extension.
TabNine Overview:
This is the Swift for Arduino TabNine client, advanced AI based autocomplete for all programming languages. TabNine Indexes your entire project by reading your .gitignoreor others, and determines which files to index.
Enter long variable names using minimal keystrokes and leverage a mnemonic completion engine.
Zero configuration. TabNine works out of the box.
Highly responsive: Produces a list of suggestions in less than 10 milliseconds on average.
Deep TabNine is trained on around 2 million files from GitHub. During training,
TabNine’s goal is to predict the next token given the tokens that came before.
To achieve this goal, TabNine learns complex behaviour, such as type inference
in dynamically typed languages.
Deep TabNine can use subtle clues that are difficult for traditional tools to access. For example,
the return type of app.get_user()is assumed to be an object
with setter methods, while the return type of app.get_users() is assumed to be a list.
Deep TabNine is based on GPT-2, which uses the Transformer network architecture. This architecture was first developed to solve problems in natural language processing. Although modelling code and modelling natural language might appear to be unrelated tasks, modelling code requires understanding English in some unexpected ways.
TabNine Deep Cloud:
TabNine requires consumption of memory resources when being run locally on your computer. It may incur some latency that is not optimal to all PC’s. With that in mind, TabNine has developed a Cloud solution, called TabNine Deep Cloud.
We understand that users concerned with their privacy prefer to keep their code on their own machine. Rest assured that we’re taking the following steps to address this concern:
For individual developers, we are working on a reduced-size model which can run on a laptop with reasonable latency. Update: we’ve released TabNine Local.
For enterprise users, we will soon roll-out the option to license the model and run it on your own hardware. We can also train a custom model for you which understands the unique patterns and style within your codebase. If this could be relevant to you or your team, we would love to hear more about your use case at enterprise@tabnine.com.
Enabling TabNine Deep Cloud sends small parts of your code to our servers to provide GPU-accelerated completions.
Other than for the purpose of fulfilling your query, your data isn’t used, saved or logged in any way.
TabNine works for all programming languages.
TabNine does not require any configuration in order to work.
TabNine does not require any external software (though it can integrate with it).
Since TabNine does not parse your code, it will never stop working because of a mismatched bracket.
Will TabNine leak my source code?
By default, TabNine makes web requests only for the purposes of downloading updates and validating registration keys. In this case your code is not sent anywhere, even to TabNine servers.
You may opt in to TabNine Deep Cloud, which allows you to use TabNine’s servers for GPU-accelerated completions powered by a deep learning model. If sending code to a cloud service is not possible, we also offer a self-hosted option.
Contact us at enterprise@tabnine.com.
Note:
A note on licensing: this repo includes source code as well as packaged TabNine binaries. The MIT license only applies to the source code, not the binaries. The binaries are covered by the TabNine End User License Agreement.
Build hooks allow you to plug into any part of entire page generation process and customize as needed.
A Highly Optimized Build Process: that will span as many CPU cores as you can throw at it to make building your site as fast as possible. For reference Elder.js easily generates a data intensive 18,000 page site in 8 minutes using a budget 4 core VM.
Svelte Everywhere: Use Svelte for your SSR templates and with partial hydration on the client for tiny html/bundle sizes.
Straightforward Data Flow: By simply associating a data function in your route.js, you have complete control over how you fetch, prepare, and manipulate data before sending it to your Svelte template. Anything you can do in Node.js, you can do to fetch your data. Multiple data sources, no problem.
Community Plugins: Easily extend what your Elder.js site can do by adding prebuilt plugins to your site.
Shortcodes: Future proof your content, whether it lives in a CMS or in static files using smart placeholders. These shortcodes can be async!
0KB JS: Defaults to 0KB of JS if your page doesn’t need JS.
Partial Hydration: Unlike most frameworks, Elder.js lets you hydrate just the parts of the client that need to be interactive allowing you to dramatically reduce your payloads while still having full control over component lazy-loading, preloading, and eager-loading.
Context
Elder.js is the result of our team’s work to build this site (ElderGuide.com) and was purpose built to solve the unique challenges of building flagship SEO sites with 10-100k+ pages.
Elder Guide Co-Founder Nick Reese has built or managed 5 major SEO properties over the past 14 years. After leading the transition of several complex sites to static site generators he loved the benefits of the JAM stack, but wished there was a better solution for complex, data intensive, projects. Elder.js is his vision for how static site generators can become viable for sites of all sizes regardless of the number of pages or how complex the data being presented is.
We hope you find this project useful whether you’re building a small personal blog or a flagship SEO site that impacts millions of users.
Project Status: Stable
Elder.js is stable and production ready.
It is being used on ElderGuide.com and 2 other flagship SEO properties that are managed by the maintainers of this project.
We believe Elder.js has reached a level of maturity where we have achieved the majority of the vision we had for the project when we set out to build a static site generator.
Our goal is to keep the hookInterface, plugin interface, and general structure of the project as static as possible.
This is a lot of words to say we’re not looking to ship a bunch of breaking changes any time soon, but will be shipping bug fixes and incremental changes that are mostly “under the hood.”
The ElderGuide.com team expects to maintain this project until 2023-2024. For a clearer vision of what we mean by this and what to expect from the Elder.js team as far as what is considered “in scope” and what isn’t, please see this comment.
Getting Started:
The quickest way to get started is to get started with the Elder.js template using degit:
npx degit Elderjs/template elderjs-app

cd elderjs-app

npm install # or "yarn"

npm start

open http://localhost:3000
This spawns a development server, so simply edit a file in src, save it, and reload the page to see your changes.
Implmentation for TMLR paper: Retiring ΔDP: New Distribution-Level Metrics for Demographic Parity, [Openreview], [Arxiv], by Xiaotian Han*, Zhimeng Jiang*, Hongye Jin*, Zirui Liu, Na Zou, Qifan Wang, Xia Hu
1. Introduction
Lots of fairness definitions (e.g., demographic parity, equalized opportunity) has been proposed to solve different types of fairness issues. In this paper, we focus on the measurement of demographic parity, $\Delta DP$, which requires the predictions of a machine learning model should be independent on sensitive attributes.
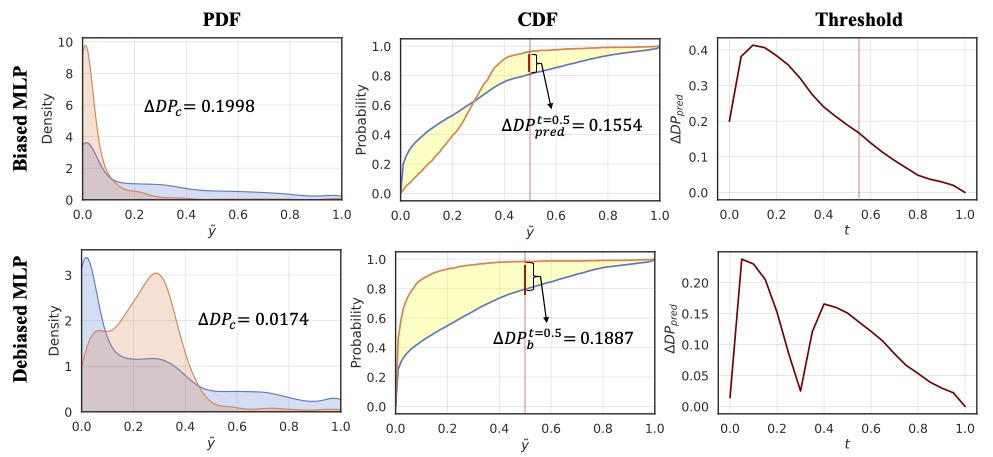
1.1 Drawbacks of commonly used $\Delta DP$
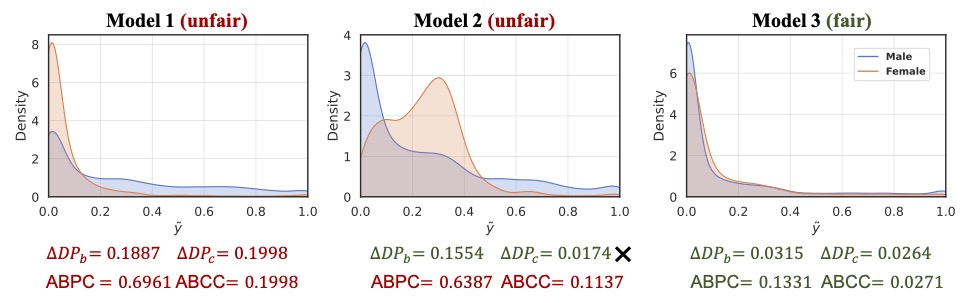
In this paper, we rethink the rationale of $\Delta DP$ and investigate its limitations on measuring the violation of demographic parity. There are two commonly used implementations of $\Delta DP$, including $\Delta DP_c$ (i.e., the difference of the mean of the predictive probabilities between different groups, and $\Delta DP_b$ (i.e., the difference of the proportion of positive prediction between different groups. We argue that $\Delta DP$, as a metric, has the following drawbacks:
Zero-value $\Delta DP$ does not guarantee zero violation of demographic parity.
$\Delta DP$ value is highly correlated to the selection of the threshold for the classification task.
1.2 The Proposed ABPC & ABCC
We propose two distribution-level metrics, namely Area Between Probability density function Curves (ABPC) and Area Between Cumulative density function Curves (ABCC), to retire $\Delta DP_{c}$ and $\Delta DP_{b}$ as follows:
Please kindly cite the following paper if you found our code helpful!
  @article{han2023retiring,
    title={Retiring $$\backslash$Delta $ DP: New Distribution-Level Metrics for Demographic Parity},
    author={Han, Xiaotian and Jiang, Zhimeng and Jin, Hongye and Liu, Zirui and Zou, Na and Wang, Qifan and Hu, Xia},
    journal={arXiv preprint arXiv:2301.13443},
    year={2023}
  }
4. Credit
We use Github Copilot to generate some comments in important code.